An Agenda can be used to schedule and keep track of events.
Features
An agenda offers the following features:
- Users can organize their schedule
- Users can bookmark sessions
- Linking directly from agenda session to polls, feedback survey or questions
- Search and filter
Get Started
“Create a new app”, select the “Event” template, and explore the different options available with the Event template if you wish to learn more about Agendas.
To create an agenda you’ll need to:
- Create and name the agenda screen
- Create and edit list data
- Set the data view settings
- Continue configuring your list
- Test the agenda in preview mode
Step 1 – Create and name the agenda screen
-
In Fliplet Studio, click on the blue “Add screens” button in the bottom left.
-
In the heading options, choose the “Lists” option.
-
Select the “List-calendar” option.
-
Click on the blue “Add 1 new screen” button in the top right corner.
-
Name the screen “Agenda” and then click “Add screen”.
-
Alternatively, use the agenda screen from the Event app template. This is how to copy screens between apps.
Step 2 – Create and edit list data
-
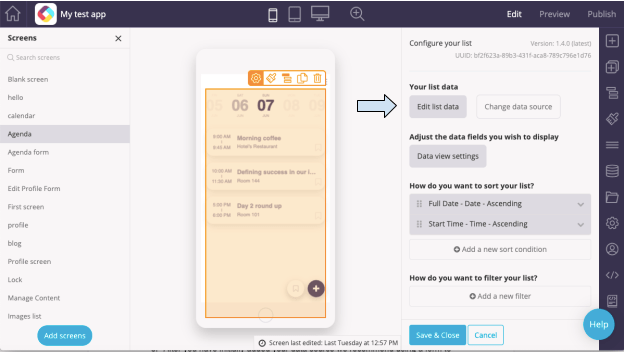
Click on the screen and the settings, “Configure your list”, a box will open on the right.
-
Click the “Create list data” button and name the data source “My agenda”, then click “OK”.</p
-
Click on the “Edit list data” button.
-
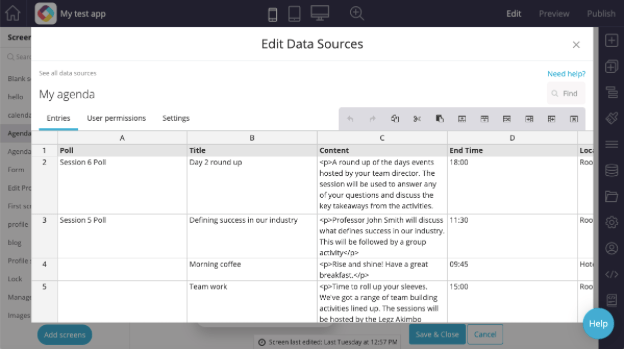
Update the “Edit Data Sources” spreadsheet with the data you wish to use.
-
The data source includes three columns for adding Polls, Surveys and Questions. In these columns add the names of the screens that hold your polls, survey form or questions form. If a session doesn’t use these features, leave the cell blank.
-
Dates should be added with this format: YYYY-MM-DD. For example: 2020-06-26.
-
Time should be added with this format: 09:00 for 9 am, 14:00 for 2 pm.
-
After you have initially added your data source we recommend using a form to edit or write new data to the data source. Learn more here.
Step 3 – Set the data view settings
Note: The gray fields cannot be changed.
-
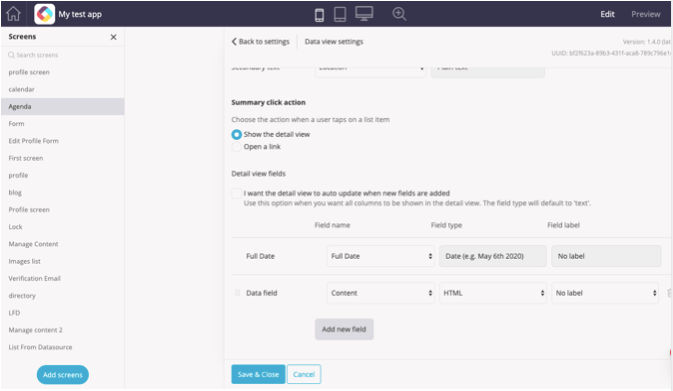
Click on the “Data view settings” button in the agenda settings. This is where you can map what data you want to display and where you want to display it. It also shows what type of data it is. We recommend “Session starting time”, “Session ending time”, “Primary text” (Title), and “Secondary text” (Location) in the first section.
-
Under Summary click action, choose the “Show the detail view” option. This is enabled by default.
-
If you wish to add more fields to the detail view, click the “Add new field” button at the bottom. You can also select different options for the detail view fields that are already listed or delete them by clicking the trash icon on the right next to the fields.
-
When you are finished selecting the data view settings, click “Save and Close”.
Step 4 – Continue configuring your list
-
Under How do you want to sort your list? select how you would like to sort your list or “Add a new sort condition”. It is recommended to leave default settings to organize the list by date and time.
-
Add any filters to your list that you wish to set. This is optional and can be used if you have several agendas that you wish to split between different screens or apps.
-
Under List search choose whether you would like to allow users to search the list and what field(s) they should be able to search by.
-
Under List filter choose whether you would like to allow users to filter the list and what field(s) they should be able to filter by.
-
Under the Agenda features tab, choose if you would like to enable a poll, survey, or questions. If you choose to implement one or more of these, select the corresponding field from the dropdown. (e.g. if Enable session survey, select “Survey” from the dropdown). If a screen name is provided in the data source entry, users will be taken to the screen for the poll, survey, or question.
-
Under the Social features tab, choose whether you would like to allow users to bookmark list items. If you would like to allow bookmarks, check the box. It should be already on by default.
-
Under the Entry management tab, choose to allow users to “Add list items”, “Edit list items”, and “Delete list items”. Use this feature to allow all users or only some users to manage the agenda data. For more information about Entry management options, read this article.
-
Click the blue “Save & Close” button.
Step 5 – Test the agenda in preview mode
-
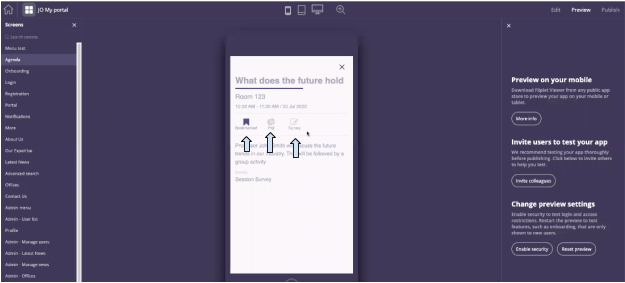
Go to “Preview” mode.
-
Make sure the correct data is showing in the list view and you can switch between your dates.
-
Open one of the sessions and confirm you can see the correct data in the detailed view.
-
If polls, surveys or questions are enabled, make sure the buttons display on the correct sessions and you can click to go to the correct screens.
-
If bookmarks are enabled, make sure you can bookmark sessions and then filter the list to only show your bookmarked items.
-
Test the search and filters if they are enabled.
-
If entry management is enabled, try to edit, delete or add new data. If only admins should be able to manage the data make sure to login as an admin to verify the edit options are enabled and log in again as a standard user to verify you cannot edit data.

-
Finally, make sure to run the same tests using the Fliplet Viewer app.
Related Articles