If you are no longer using your app, want to retire your app, or unpublish your app there are some steps Fliplet recommends you take.
Get started
- Delete your app from the app stores or your MDM
- Delete app tokens
- Delete integration data
- Delete all files that relate to your app
- Delete any data sources your app is using
- Delete the app from your Fliplet Studio account
Step 1 – Delete your app from the app stores or MDM
Note: When removing your app from a public app store it often takes some time before the app is removed by the app store. Anyone that has the app can continue using the app, you cannot remove an app from a user’s device once they have installed the app. If you want to prevent further use of the app, you should add a screen to your app informing users that the app is no longer in use and publish an update to the app. See here for more on in-app updates.
Apple App Store
From the guide here: https://help.apple.com/app-store-connect/#/dev7013b314c
- From the homepage, click My Apps, select the app you want to remove, then in the left column, select Pricing and Availability
- On the right, below Availability, select Remove from sale
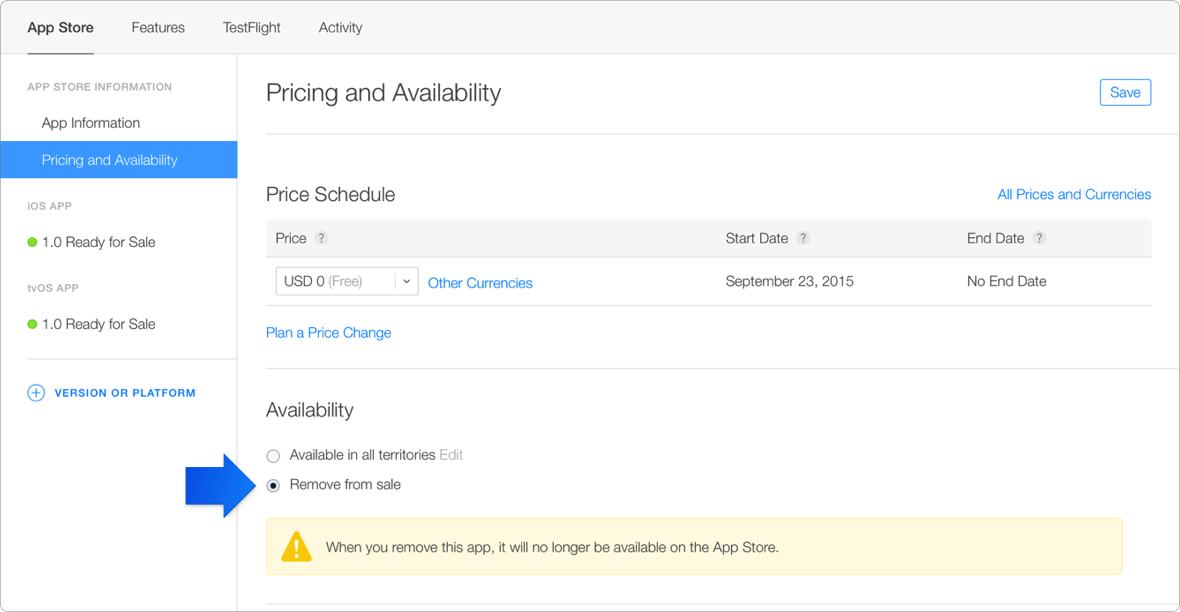
- In the upper-right corner, click Save.
Google Play
- Open Play Console and log in
- Select the app you want to unpublish
- Go to Release > Setup > Advanced settings.
On the App Availability tab, select Unpublish.
MDM
To remove your app from the MDM, you should contact your MDM manager or your MDM support site.
Step 2 – Delete App Tokens
- In your app, open the App Settings and click on the App tokens tab
- Find any API tokens and tokens for completed app builds

- Click Edit next to the relevant token, a new window will pop up
- Scroll to the bottom and click ‘delete token permanently’
Note – deleting tokens will remove key functionality such as writing/reading from a data source immediately. Only do this when you are certain you want to retire your app.
Step 4 – Delete integration data
When retiring and deleting an app, it’s crucial to handle sensitive data securely. Here’s what you should do with Firebase, APNs (Apple Push Notification Service), and SAML2 (Security Assertion Markup Language 2) details:
-
Firebase Details:
- Revoke Firebase API keys: Go to the Firebase console, navigate to your project settings, and revoke the API keys associated with your app. This will prevent unauthorized access to your Firebase resources.
- Delete Firebase project: If you’re completely retiring the app and no longer need any Firebase resources, consider deleting the Firebase project associated with your app. This will remove all Firebase services and data related to your app.
- Inform users: If your Firebase database contains user data, it’s important to inform users about the app retirement and deletion of their data, as per privacy regulations.
-
APNs Details:
- Revoke APNs certificates: If you’ve used APNs for push notifications, revoke the APNs certificates associated with your app. This will prevent your app from sending any further push notifications.
- Update server settings: If your server communicates with APNs, update the server settings to stop sending push notifications to your app.
-
SAML2 Details:
- Revoke SAML2 configurations: If your app uses SAML2 for authentication or single sign-on (SSO), revoke the SAML2 configurations associated with your app.
- Update authentication settings: If your app integrates with an identity provider for SAML2 authentication, update the authentication settings to disable SAML2 authentication for your app.
If the APNs details are being used for another app, you should handle the retirement and deletion process differently to ensure that the other app remains functional and secure. Here’s how you can approach it:
-
APNs Details:
- Review usage: Determine if the APNs certificates and configurations are being utilized by other apps for push notifications.
- Coordinate with developers: Work with the developers of the other apps to ensure that they are aware of the changes and to coordinate any necessary updates to their push notification configurations.
- Reissue certificates: If necessary, reissue APNs certificates specifically for the remaining apps, ensuring that they are configured correctly
In summary, the key is to carefully review the usage of these accounts and configurations across all relevant apps and services. Communication and coordination with stakeholders, developers, and administrators are essential to ensure a smooth transition while maintaining security and functionality for the remaining apps.
Step 3 – Delete all files that relate to your app
- Open your Fliplet app and select the file manager option from the right-hand side menu
- Locate the files you want to delete and select the tick box
- Select action on the right-hand side and choose delete
- Once you have deleted all files, select the trash option on the left-hand side menu
- Select all files, click action, and select delete forever to permanently erase your files from Fliplet Studio
Step 4 – Delete any data sources your app is using
- Open your Fliplet app and select the app data option from the right-hand side menu
- Select the data source you want to delete
- Choose the settings tab and scroll down to the bottom
- Select move to trash and confirm
- Select the trash option from the top right, click action, and select delete forever to permanently erase your data source from Fliplet Studio
Step 5 – Delete the app from your Fliplet Studio account
- To delete an app in Fliplet, it must first be archived
- From your home screen, locate the app you want to delete
- Select the “more” option
- From the drop-down menu, select “Archive app”
- The app will be moved to the “Archived” tab
- To view archived apps, go to the “Archived” tab at the top of the screen
- Apps can also be archived from the “Organization dashboard” by choosing the “Apps” tab, selecting the action drop-down, and choosing “Archive app”
- From the “Archived” tab, locate the app you want to permanently delete
- Select “Delete permanently” to remove the app from your account
- Once an app is deleted, it cannot be restored
- Apps can also be permanently deleted via the “Organization dashboard” by choosing the “Apps” tab, selecting the action drop-down, and choosing “Delete permanently”
Related Articles