The Capacity Management addition to the Directory solution is a tool designed to enhance operational agility, transparency, and engagement within an organization. By enabling users to log daily work status and capacity, it fosters a real-time understanding of workforce availability, facilitating informed business decisions and efficient management of work opportunities. The tool also encourages employee autonomy, allowing them to claim available work opportunities, promoting optimal resource allocation, and fostering a culture of responsibility. In essence, the app is a powerful aid in bolstering organizational resilience and growth.
This article covers the following
Benefits
This application offers increased transparency and efficiency in work capacity management, enhancing overall productivity. It promotes better communication and collaboration, can help support professional development, and optimizes resource utilization.
Use cases
Employees can utilize this app to:
- Update daily work status and capacity
- View assigned work opportunities and claim open ones
- Update their list of skills so they can be featured for relevant work opportunities
Managers can employ the app to:
- View the capacity and work status of all employees in a Directory view or a report screen
- Create new work opportunities and monitor existing ones
- Search/filter based on employee’s skills and create custom lists of people for different groups or projects
Features
- My work
- Open work opportunities
- Default work status
- My capacity
- My skills
- Directory with capacity
- Capacity report
- Saved reports
- Manage work opportunity
- Created work opportunities
- Automated notifications
- My Work
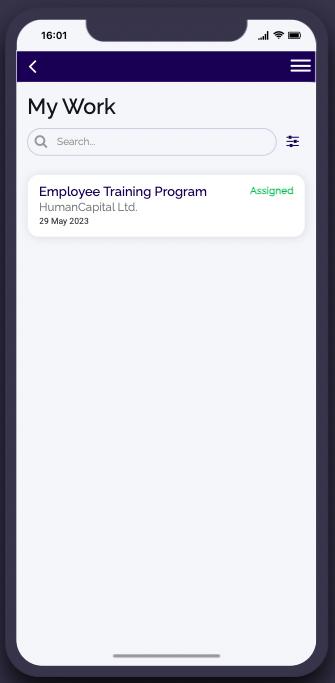
If users have been invited to a new work opportunity or have been accepted for an open work opportunity those will show here.
Users will also be notified of any new opportunities or updates to their application.
Users can view their assigned tasks and opportunities, view additional details, and update the overall status of work.
- Open work opportunities

Users can see open work opportunities and apply to them from the home screen. Clicking on a work opportunity will show detailed information and any requirements with a button to apply.
Users can filter the list based on skills and set notifications based on those preferences.
Users with the relevant skills will be notified of any new open work opportunities.
If a manager accepts a user’s application, the user will get a notification in the ‘My Work’ screen. - Default work status
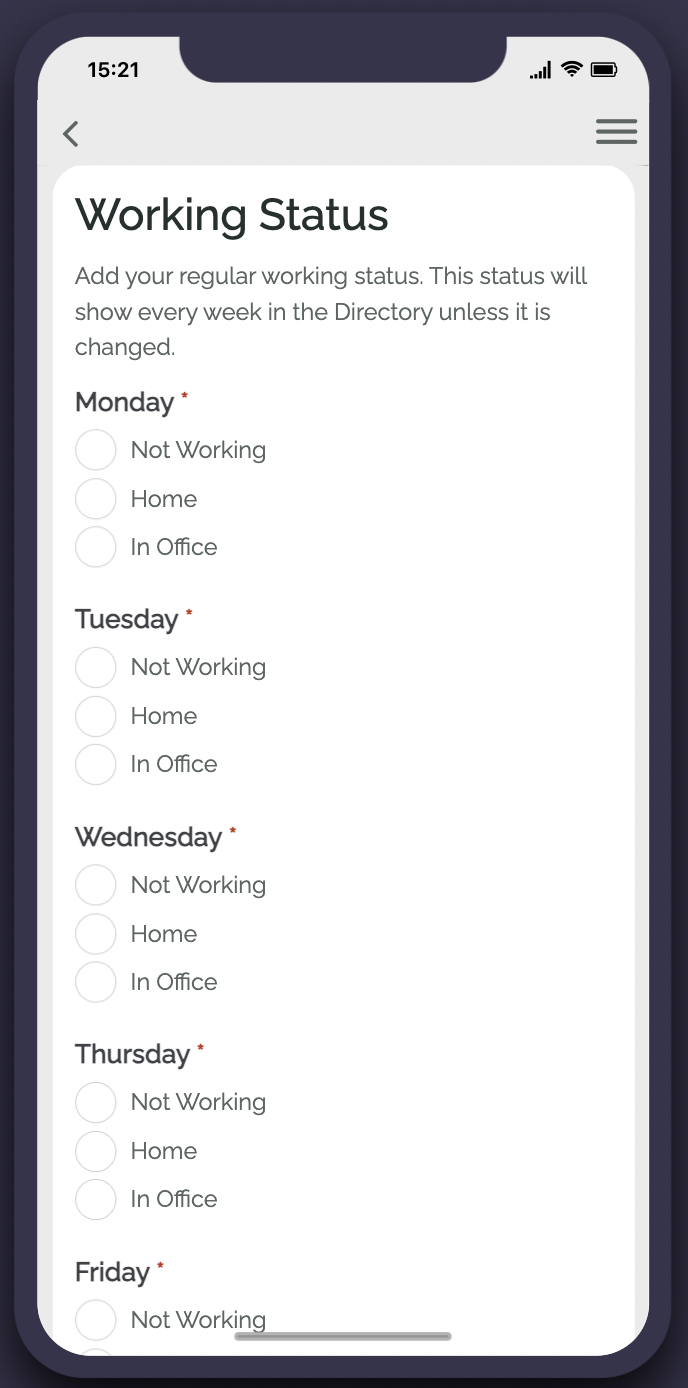
Users can set a default working status so it doesn’t need to be changed weekly.
Users who have already set their weekly capacity will be able to view their status by clicking my profile. If you have not set your status you will see a prompt to do this on the home screen.
The options for your daily status are: not working, home, in office. - My capacity
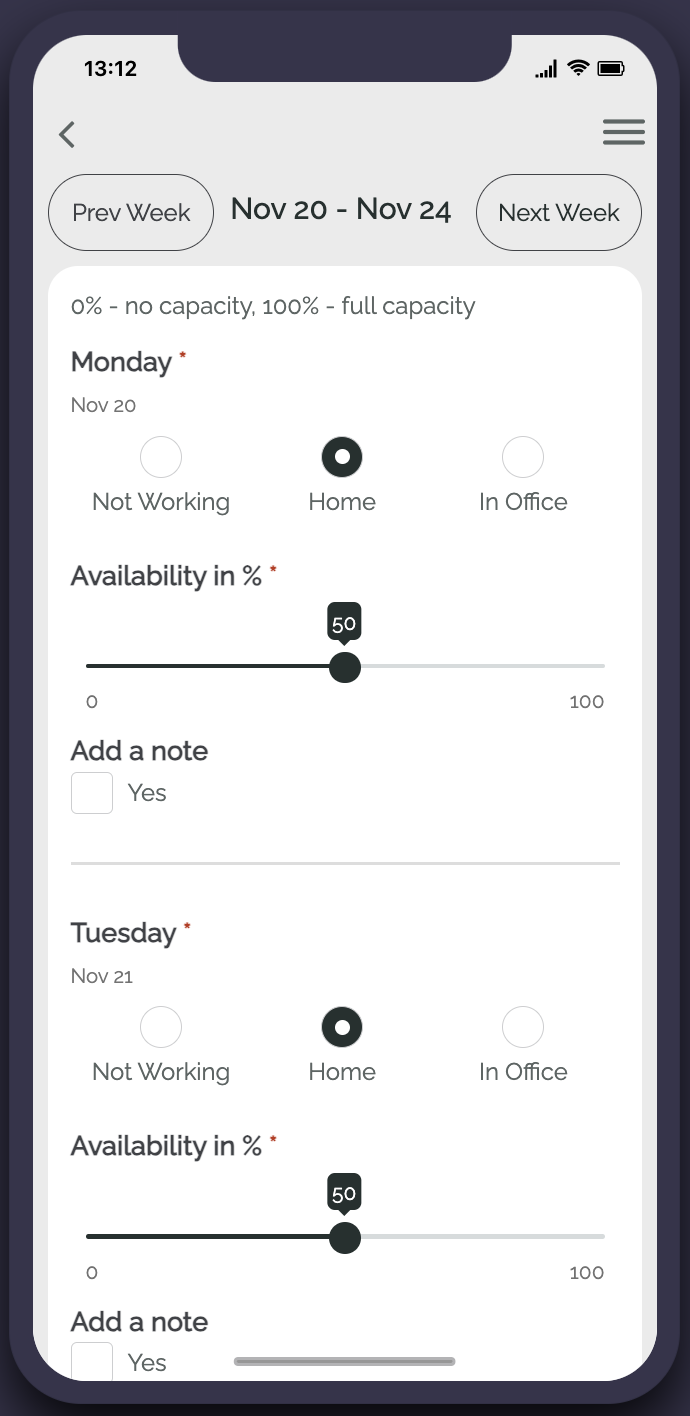
Users who haven’t yet updated their capacity, will be notified to do so on the home screen. Capacity can be updated as well as working status. For each weekday of the current week users can set their:
Working status: not working, home, in office
If a user is not working they have the option to update the status to one of the following reasons: sick, holiday, or on leave
Capacity will show as a percentage. - My skills
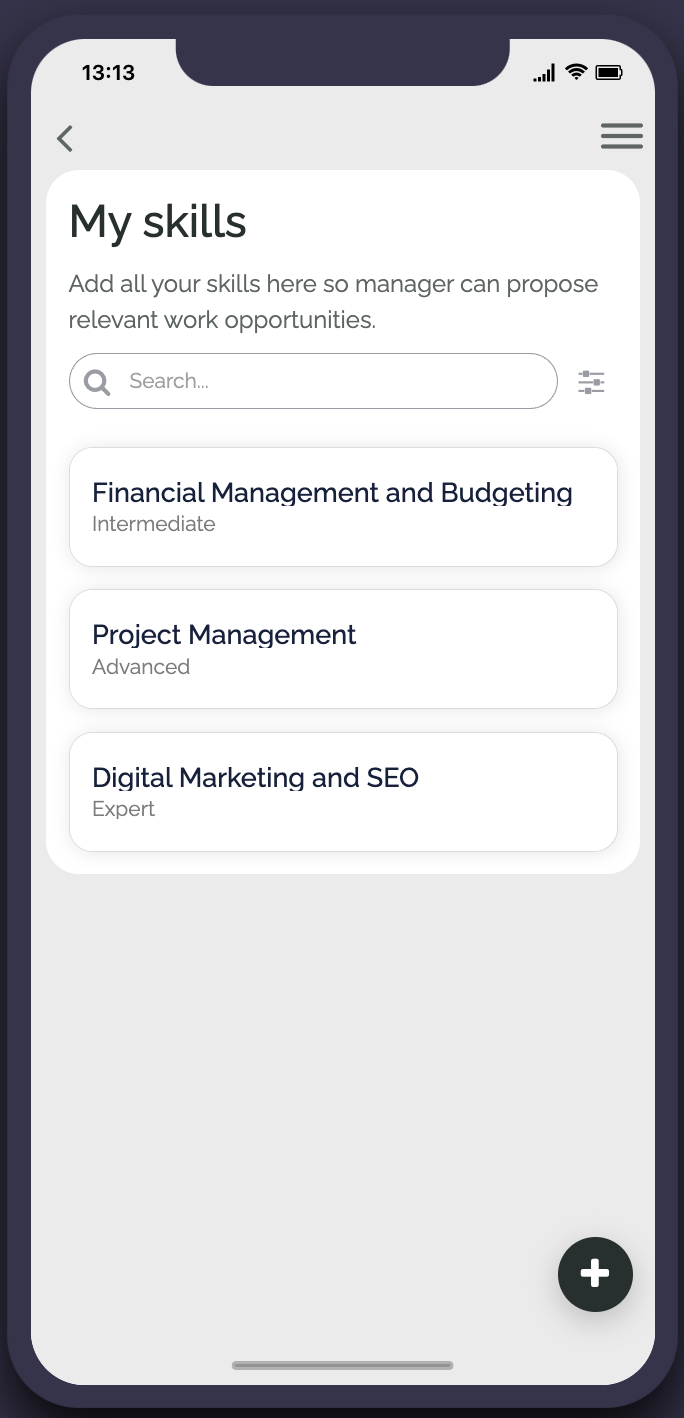
Users can view, add or, update their relevant skills to be available for more work opportunities.
To access this, users should click “edit profile” from the home screen and then choose “my skills”
Skills are preset to ensure consistency and can be set and updated by any capacity managers.
Having skills set within a user profile supports managers in finding the right person for work opportunities. - Directory with capacity
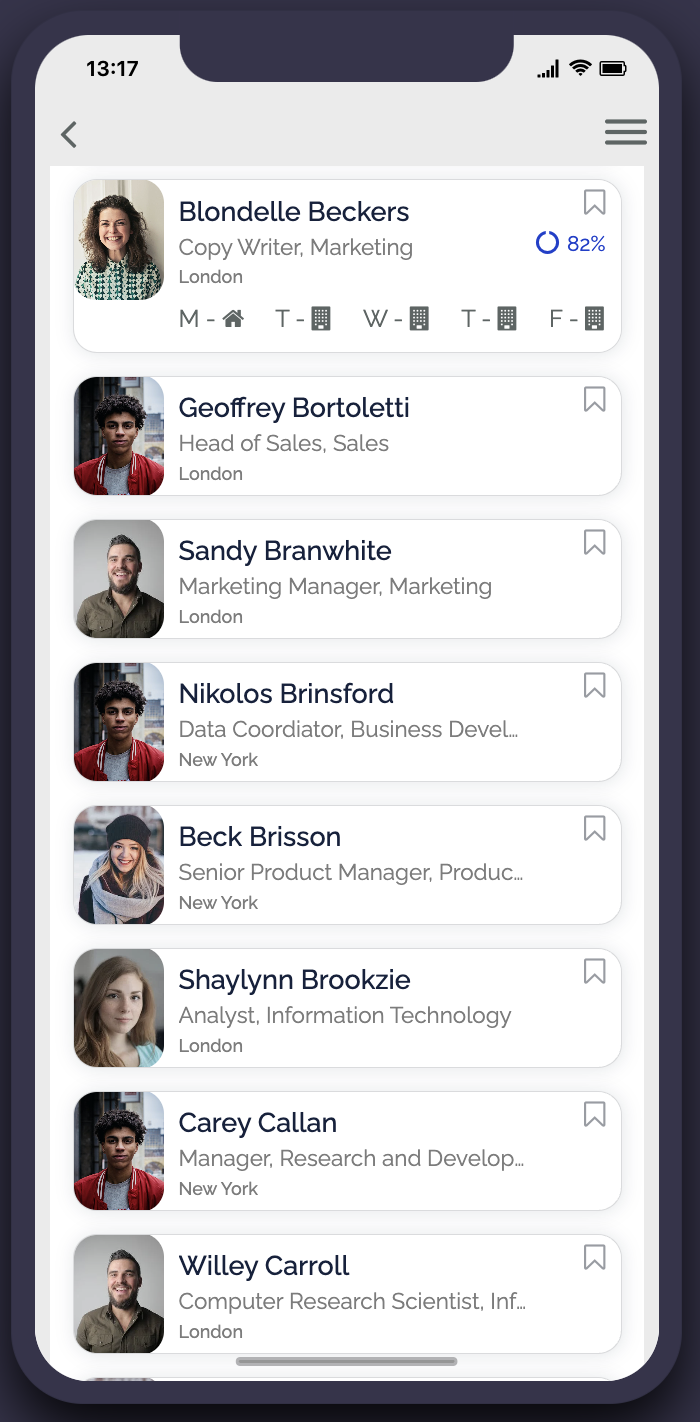
Managers can view the user directory with each user’s working status and capacity displayed.
This view of the directory will show only to capacity managers. The regular directory will include working status only.
They will also see this screen after creating an assigned work opportunity to select a user to assign to.
- Capacity report
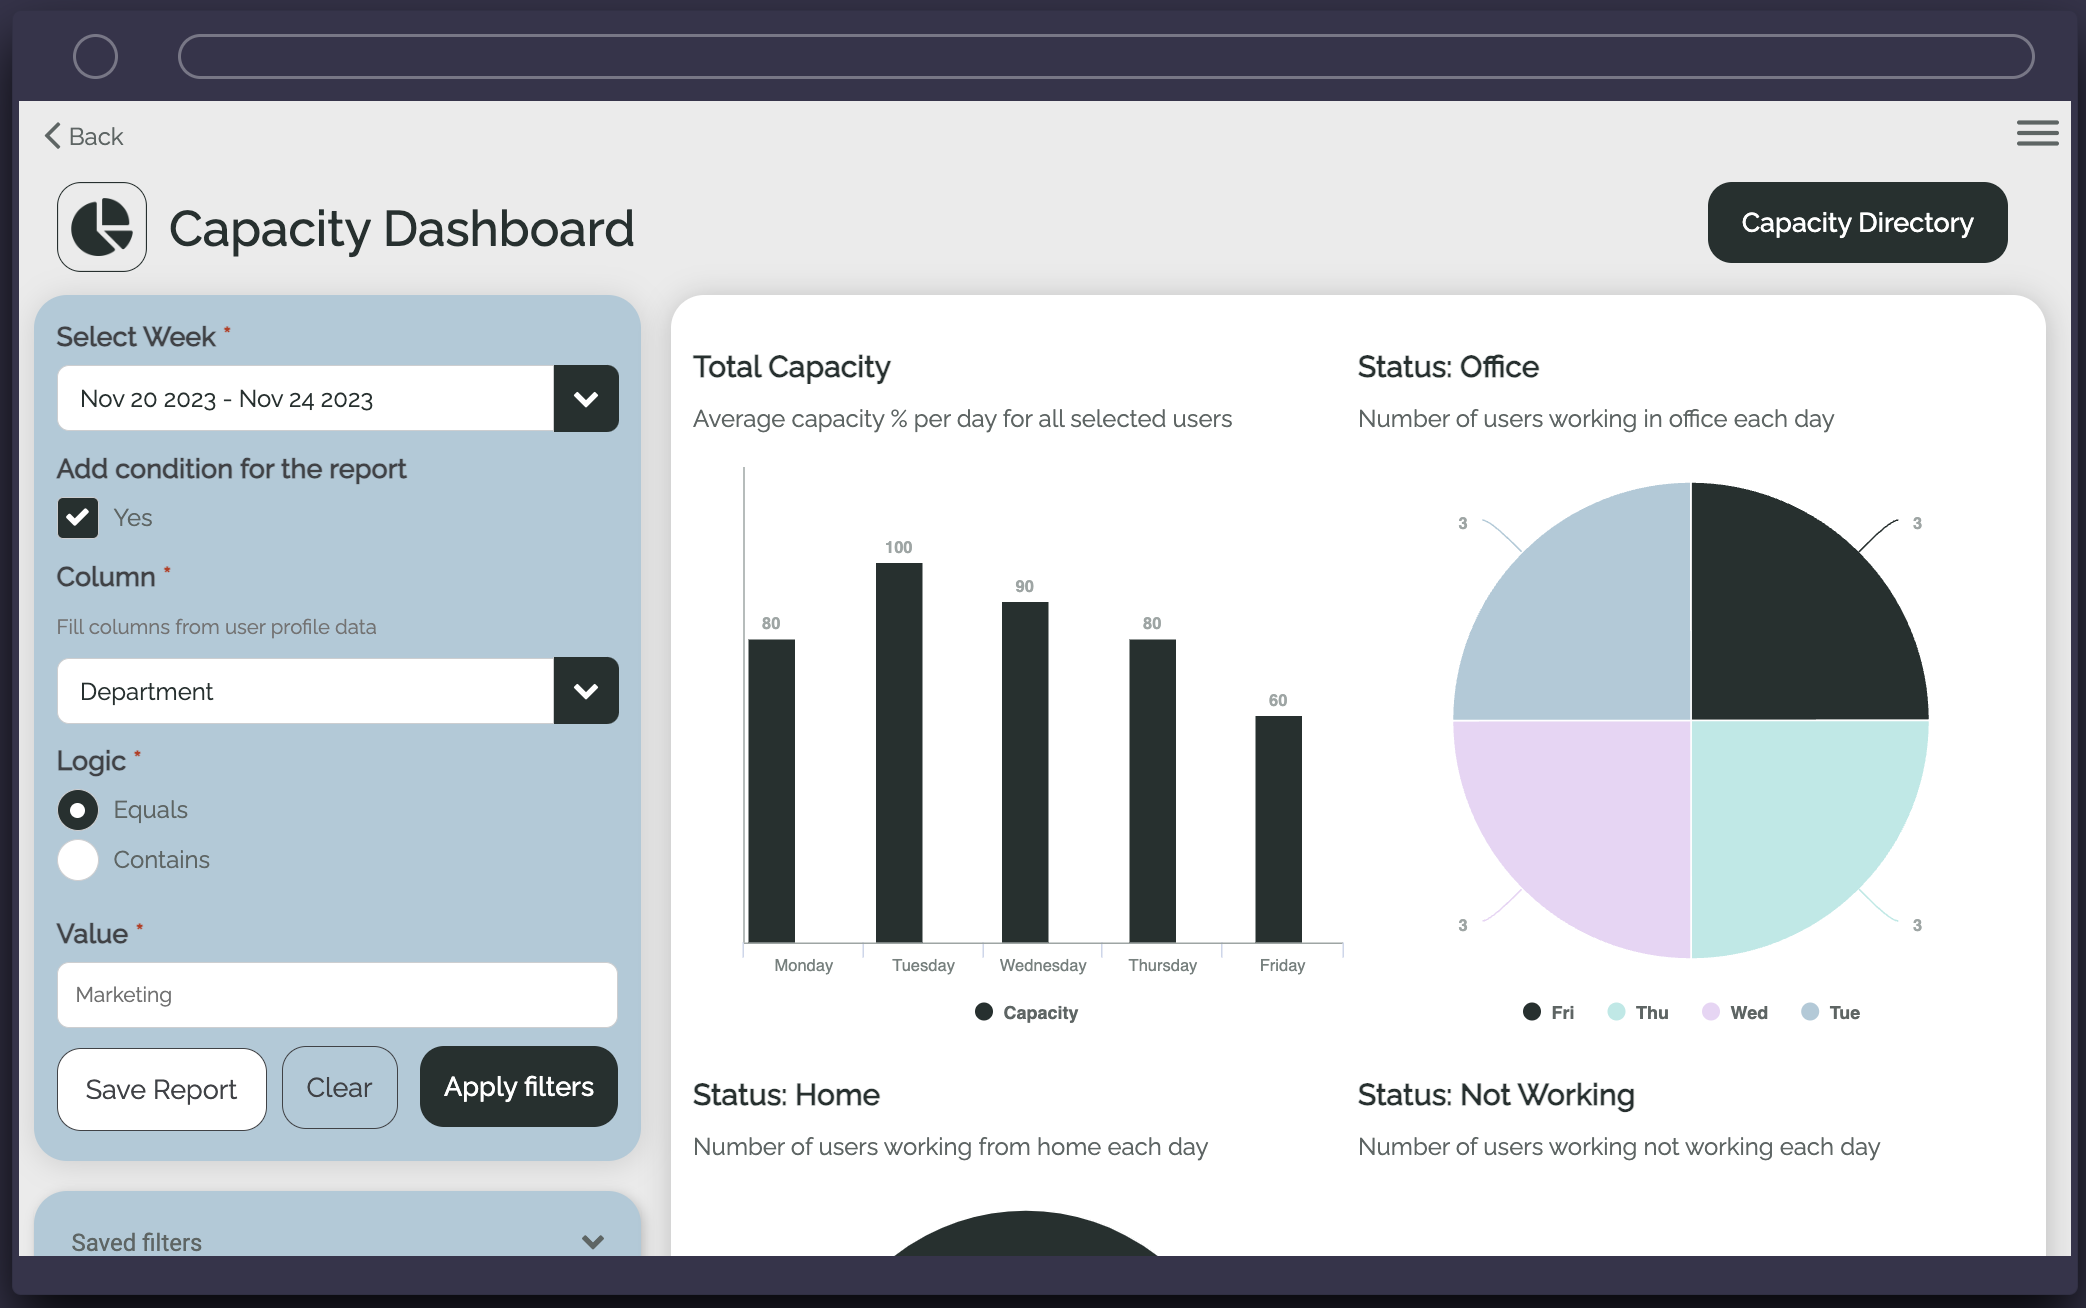
This screen is best used on a desktop and can be accessed from the home screen under the capacity dashboard.
A manager can view the reported capacity of relevant employees for a select week.
Using the report screen, managers can apply conditions for the report.
Filters can be saved, and subsequently stored in the saved report option in the capacity manager menu.
The data presented will be:- Total capacity
- Status: Office
- Status: Home
- Status: Leave
- Saved Reports
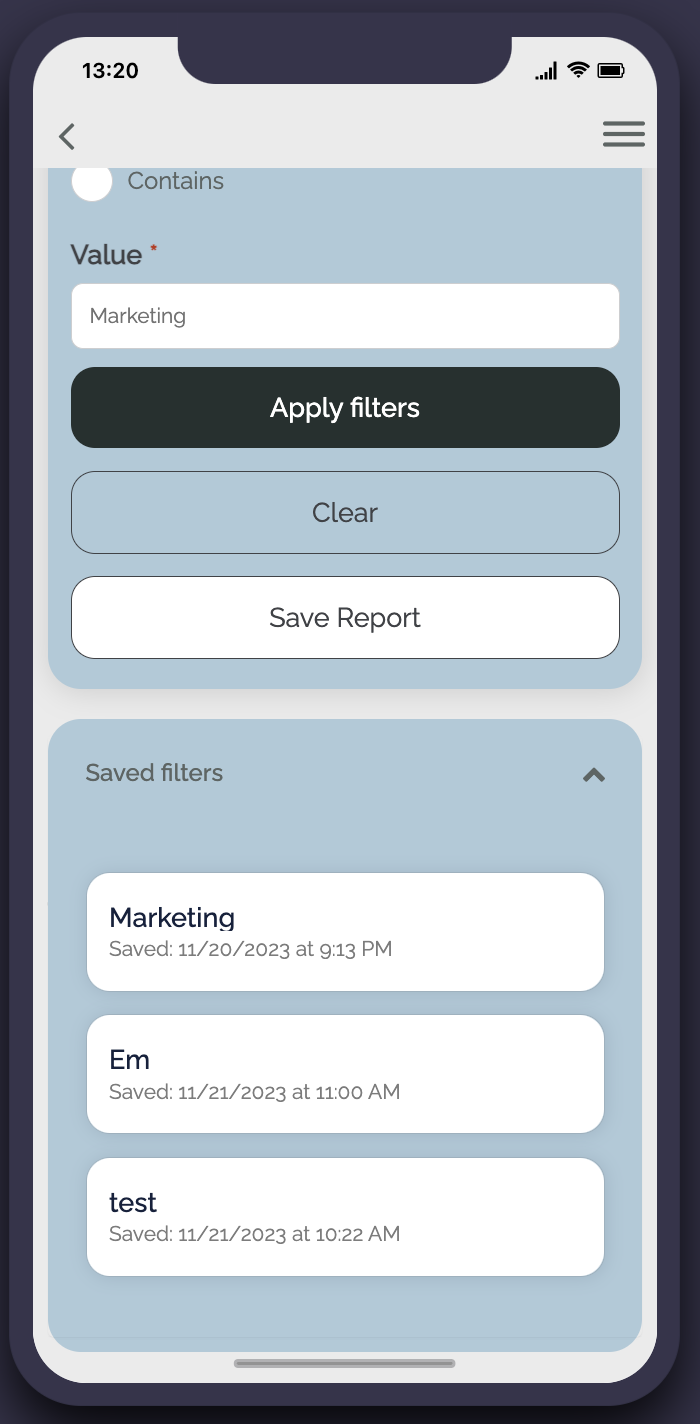
A list of saved capacity reports to easily reapply filters and view reports.
- Manage work opportunity
Managers can add or edit work opportunities using this screen.
Work opportunities can be:
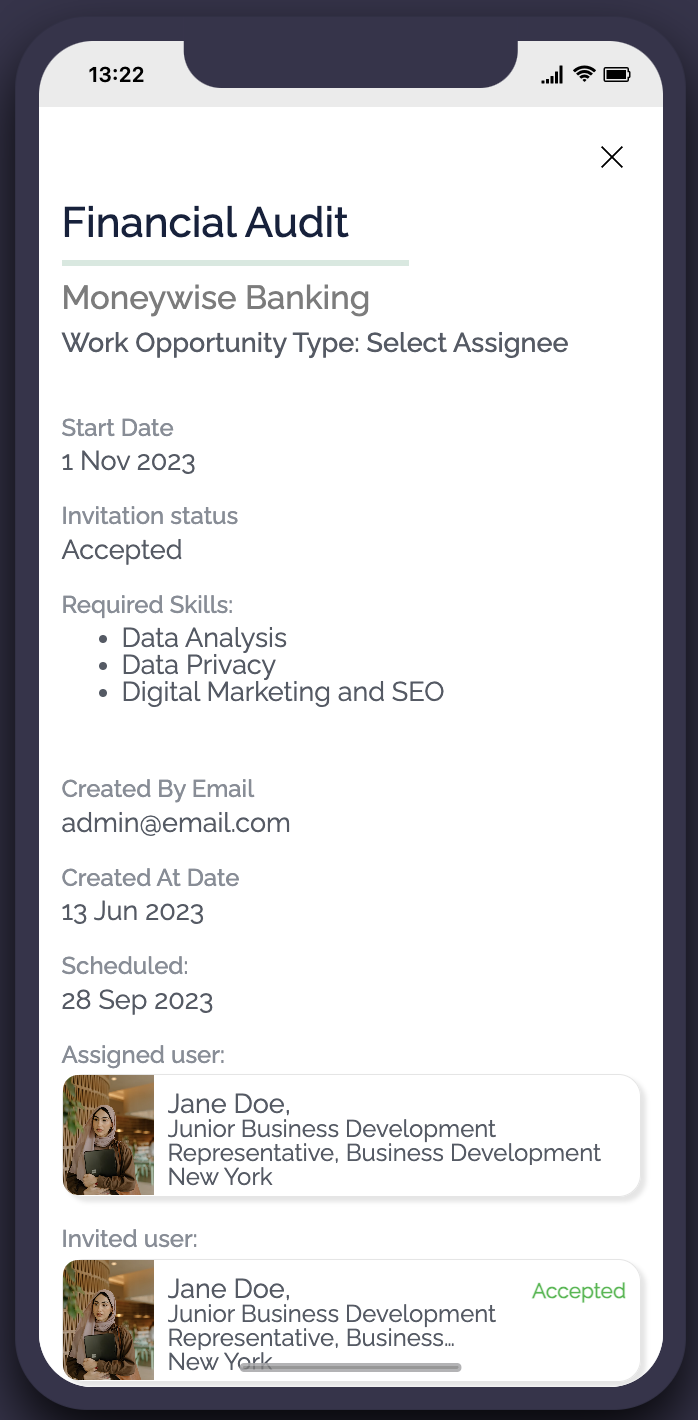
Select assignee – prompting the manager to choose a specific user to invite who can accept or decline the work. The specific user will then receive a notification alerting them to the work opportunity.
When choosing this option, managers will be presented with a filtered directory of users who fit the required skills and details of their capacity and working status.
Open work – enabling users to apply and the manager to select a user to do the work
Using the form you can add specific requirements to the work opportunity, including required skills, due date, and choose when to publish the opportunity, either immediately or on a set date.
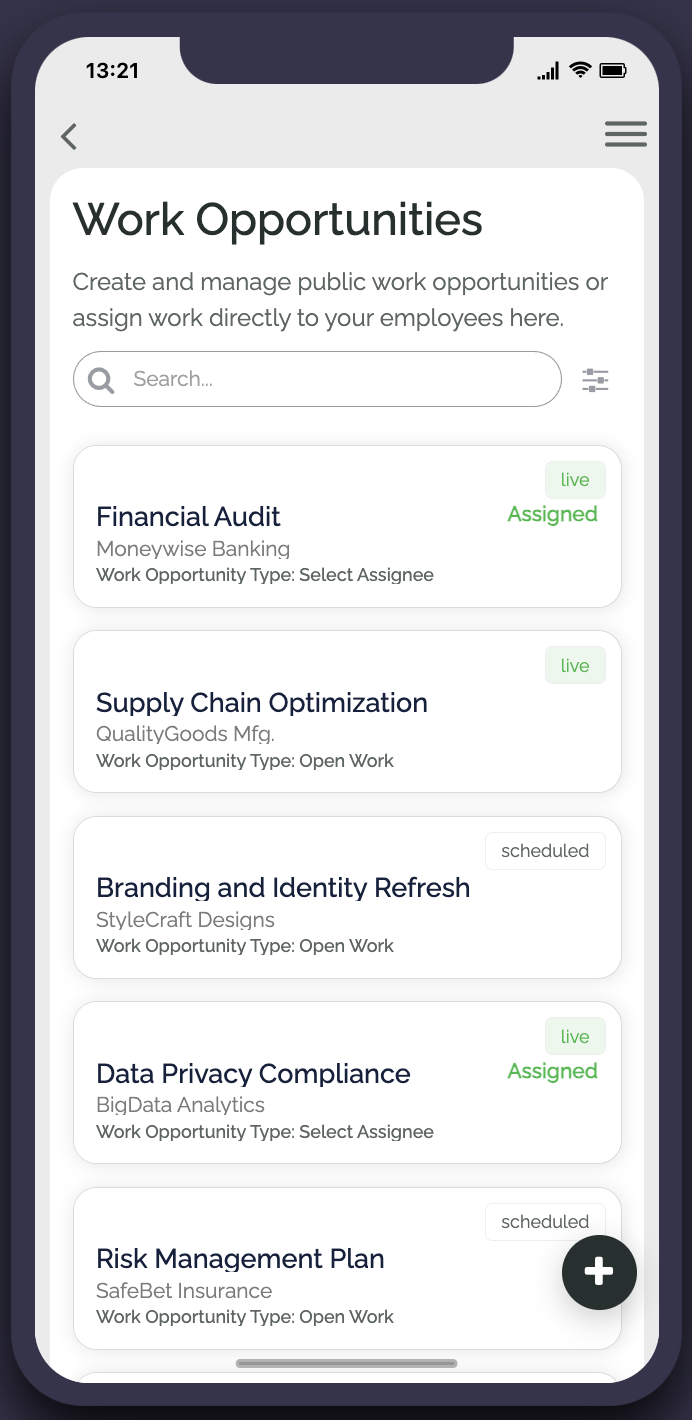
- Created work opportunities
Managers can follow the status of work opportunities they have created, and choose or adjust assignees.
Each opportunity will show “assigned” if there is a user currently assigned to the work.
Clicking on a work opportunity will show more details and any applicants, enabling managers to accept. - Automated notifications
Admins can send notifications within the app.
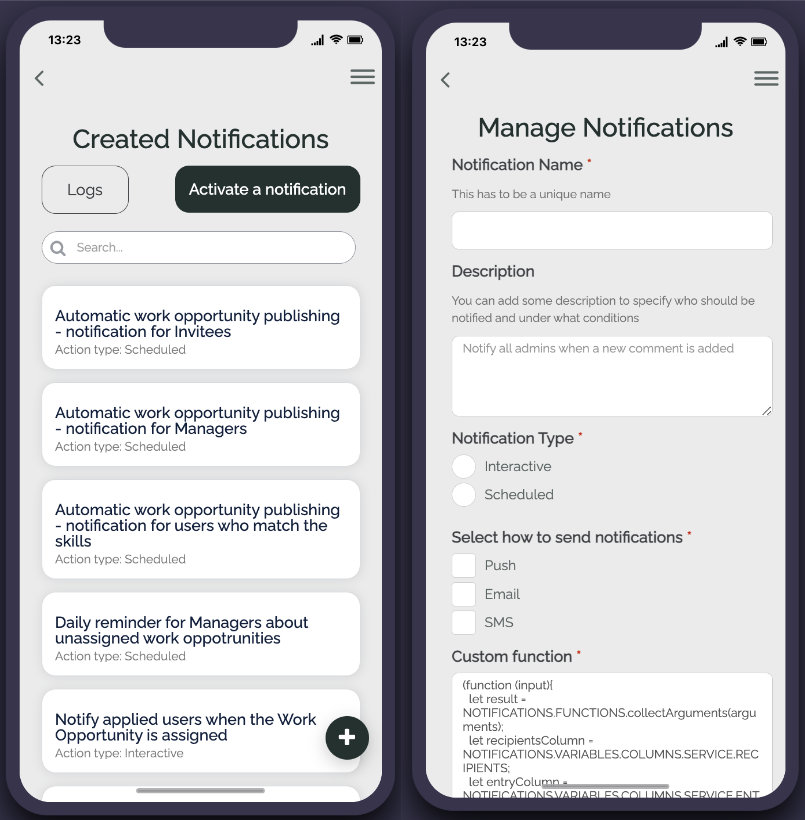
Notifications can be sent from the “Admin – manage notifications” screen, where users will see a list of previously created notifications or choose to create a new one.
The form includes multiple options to make the notification required regardless of the user’s notification preferences or choosing to send the notification based on a specific action.
Two notification types can be sent:- Interactive – a notification that occurs when a specific action is taken in the app. The actions to choose between are a click, submitting a form, or deleting an entry.
- Scheduled – a notification that can be sent on a regular schedule.
To learn more about setting up notifications, see here.
Users can view notification logs to view sent notifications and verify notification results.
Note: For notifications to be received in the live app, they must be sent from the live app. If notifications are sent via Fliplet Studio, they will only show to users in Fliplet Studio and not the live app
User roles
User role overview
|
User role |
Definition |
User-specific features |
|
Capacity managers |
Create or adjust work opportunities and monitor capacity |
|
|
Regular users |
Should update their capacity and will have access to work opportunities |
|
Solution set up
The capacity management solution is an extension of the directory solution. To view solution set up items specific to the Directory, see here.
Setting up automated notifications
- Log in to the app as an admin user
- Select the hamburger menu, and choose “Admin”
- Scroll down and choose “Manage automated notifications”
- Here you can choose between selecting an existing notification or creating a new one.
- Selecting an existing notification will give you the option to edit, delete, or duplicate the notification.
- To create a new notification press the “+” button
- This will open the manage notifications form with the following options:
- Notification name – This requires a unique name and cannot be the same as an existing notification
- Description – A description for the notification
- Notification type – Choose between interactive and scheduled
- Interactive – a notification that occurs when a specific action is taken in the app.
The actions to choose between are:
afterFormSubmit – The notification will occur once a form has been submitted. The “select a screen where the action is triggered” form field should be selected based on which screen the form can be found on.
fListDataBeforeDeleteEntry – The notification will occur once an entry has been deleted from a list from data source. The “select a screen where the action is triggered” form field should be selected based on which screen the list from data source can be found on.
click – The notification will occur once a certain component is clicked. The “clicked element class name” field should be filled with the custom class name of a clickable element. For more support on this, please reach out to support using the live chat or email us on support@fliplet.com - Scheduled – a notification that can be sent on a regular schedule.
When creating a scheduled notification you will need to set a frequency using a cron expression. If you are not familiar with using a cron expression, examples can be found here. - Timezone – Select a time zone for the scheduled notification to be based on
- Interactive – a notification that occurs when a specific action is taken in the app.
- Select how to send notifications – Options to chose from any or all of the following:
- Push – give the push notification a title and a body and chose whether to link the recipient to a screen if the notification is clicked
- Email – give the email notification a title and a body using the rich text field. To a
- SMS – type the SMS message exactly as you want it to be sent
- Custom function – this option enables you to send notifications to specific users. This requires advanced knowledge of code. If you are unfamiliar with JavaScript you can leave this option with the default settings
- Make the notification required – If a notification is marked as required, it will be sent regardless of the user’s notification preferences
- Select the column name from users data source, where the optional notification settings are stored – selecting the correct data source here will ensure that notifications are sent based on user preferences
- Make the action inactive – this option is to edit a live notification to prevent any further notifications from being sent based on this action.
- Test mode means no notifications will be sent to the users, they will be only created, live will send the notification
- Click submit
- Notifications can be reviewed in the notification logs, or edited from the admin manage notifications screen.
Additional information
Content Required
- All user details should be added to the Directory, except skills, which should be set by an app admin or updated by users directly
- Skills should be added to a separate data source so users can update it from the list
- Users who must update their capacity should have their “Update Capacity” value set to “Yes”.
- Any managers or people who can create work opportunities and see user’s capacity should have “Capacity Manager” set to “Yes”