The registration screen and login screen must be linked together so that the app functions properly and restricts use to those who are not properly logged in.
Features
Linking a registration screen and login screen offers the following features:
- Users cannot view all screens without logging in
- App creator can prevent people who do not have access from logging in
- The Login screen and the Registration screen use the same data source
Get Started
To link the registration screen and the login screen you’ll need to:
- Setup a registration screen
- Setup a login screen
- Link the login screen to the registration screen
- Link the registration screen to login
- Setup and test the app security rule
1. Setup registration screen
Refer to the registration screen tutorial for directions on how to set up a registration screen.
2. Setup login screen
Refer to the login screen tutorial for directions on how to set up a login screen.
3. Link login screen to registration screen
Although the registration screen and login screen have been set up, they won’t work together until they have been linked and security rules have been put in place.
You should have already done this in step 4 of the login screen tutorial.
4. Link registration screen to login
- Go to the registration screen
- Click on the form to open up the settings
- In the settings scroll all the way to the bottom
- There is an option that says After the form has been submitted.
- Choose the option “Take the user to another screen” and select the login screen from the drop-down.
- The settings should look like this:
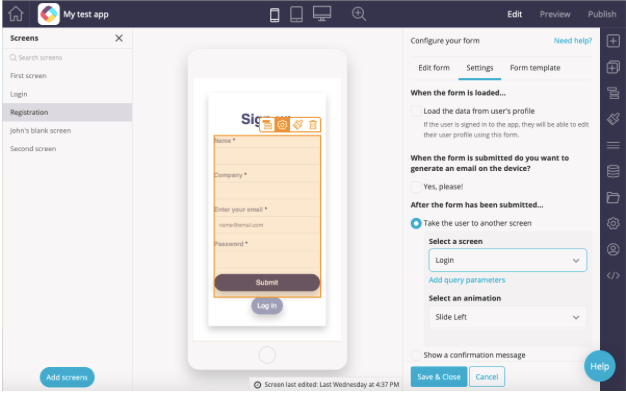
- Click “Save and Close”
- Now when users click submit on the registration screen, users will automatically be taken to the login screen.
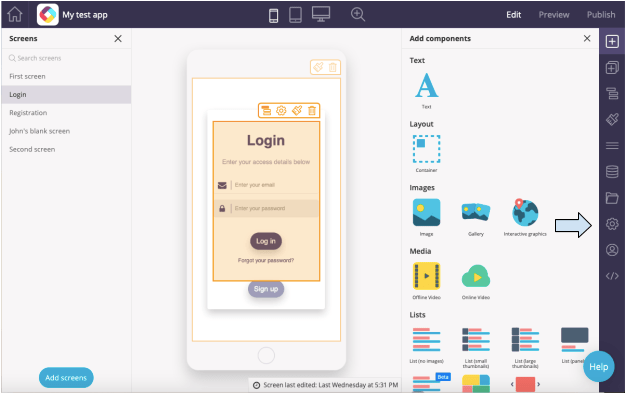
- The registration screen and the login screen must use the same data source. If this is not the case:
- Go to the login screen settings and select the same data source that you used for the registration screen.
- Under select the email field, choose “Email input”.
- Under select the password field, choose “Password input”.
- Click “Save and Close”.
5. Setup and test app security rule
- Go to the app settings by clicking on the app settings button on the far right. (See the arrow in the image below).
- Click on the tab at the top that says “App Security”.
- Click on the button that says “Add new rule”
- Choose the options displayed in this image:
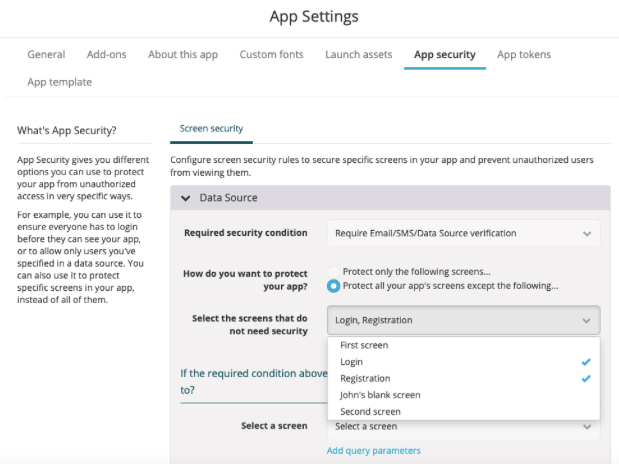
- This means users will only be able to access the Login screen and the Registration screen unless they are logged in already.
- Finally where it says “if the required condition above is not met, which screen should the user be redirected to?” Under “Select a screen” choose “Login”.
- This means that whenever a user is not logged in, they will be taken directly to the login screen.
- Now the form should look like this:
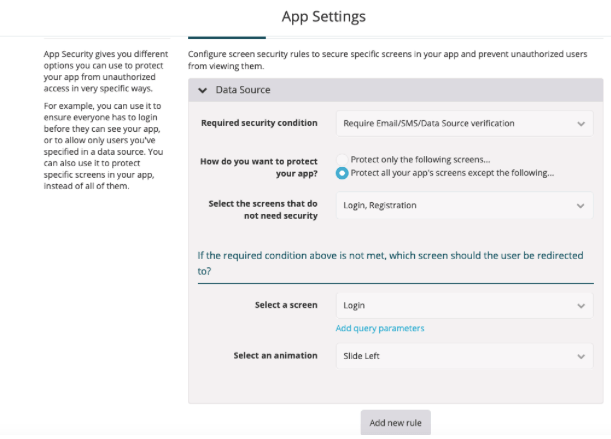
- Click the blue “Save” button.
- To test the rule go to preview mode.
- Click on the “Enable Security” button (next to the arrow).
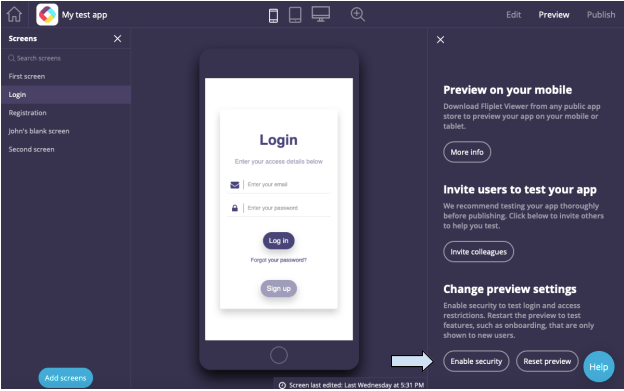
- If you are logged in, click the reset preview button.
- Now you can test by trying to move to the other screens. With the security enabled, the app should prevent you from viewing your other screens and should revert back to the login.
Related Articles
Was this article helpful?
YesNo