Emergency Management is an all-in-one solution designed to foster preparedness and provide organizations and their clients with the necessary tools to respond safely and effectively to raids and crises.
The solution facilitates real-time task management and communication to work quickly and efficiently during drills and emergencies.
This article covers the following
Benefits
- Faster response – respond to emergencies faster by getting immediate notifications and updates
- Increase productivity – create greater visibility for everyone to understand their role and specific tasks
- Communication – engage in real-time, two-way communication with clients or internally
- Preparedness – provide quick-read guidance and interactive learning tools to educate on how to prevent and prepare for an emergency
- Customizable – customizable templates to fit client organization structure
Use cases
Below we will highlight two suggested modes of use. The solution can be used to structure an emergency response workflow depending on your specific business needs.
Use case 1 – the app is produced by a company for their customers, customers can then modify crisis templates to suit their organization.
E.g. Law firm creates an app with templated crisis and invites their customers, their customers can copy the template, customize it, and invite their colleagues
Potential use cases for this option:
- Dawn raids
- Reputational, PR, or brand crisis
- Unannounced inspection
- Health and safety inspections
- Government subpoena
Use case 2 – the app is produced for internal use by a single organization
E.g. IT team uses the app to help the company manage a data breach, and all staff have access to the app
Potential use cases for this option:
- Natural disaster, fire, or terrorist incident
- IT emergency, infrastructure outage, or data loss
- A cyber attack or data breach
- Accident causing serious injury or death (employee injuries)
- Employee breach of contract
Features
Emergencies and emergency action lists
- Home screen
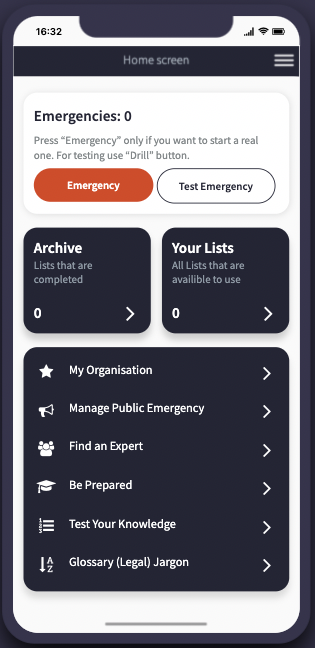
The home screen will enable the user to navigate through key areas of the app. Users can also quickly report an emergency, run a drill or test an emergency, and create a new emergency task list from this screen. - Emergency dashboard
The emergency dashboard will provide access to the following:
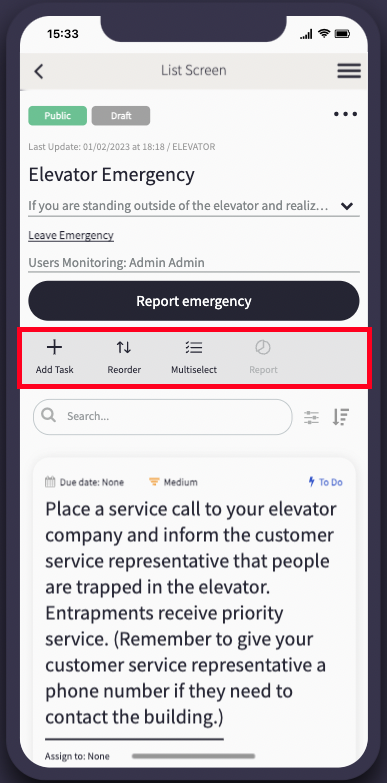
- Add task
Use this function to add new tasks to the emergency task list
Add a title, description, and priority. Optionally, assign the emergency to someone in your organization and set a deadline - Reorder
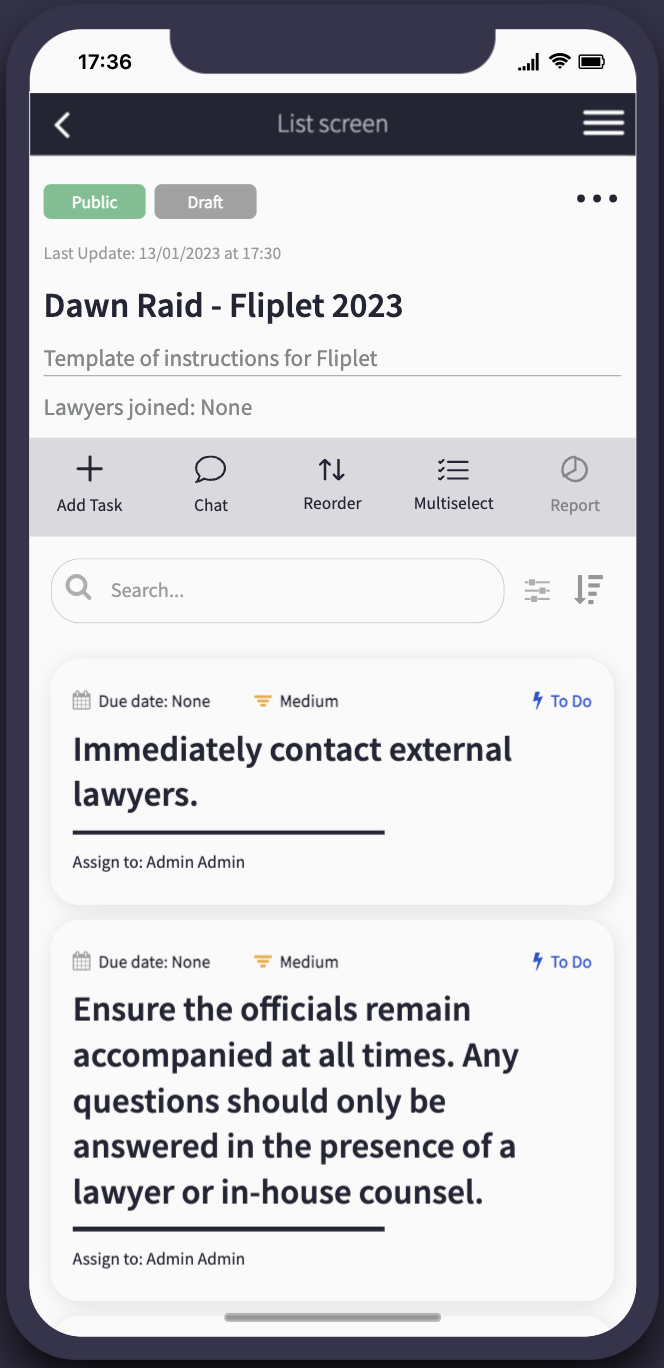
Use this function to reorder tasks in your Emergency task list by dragging and dropping them in the correct order on your device screen - Multi-select
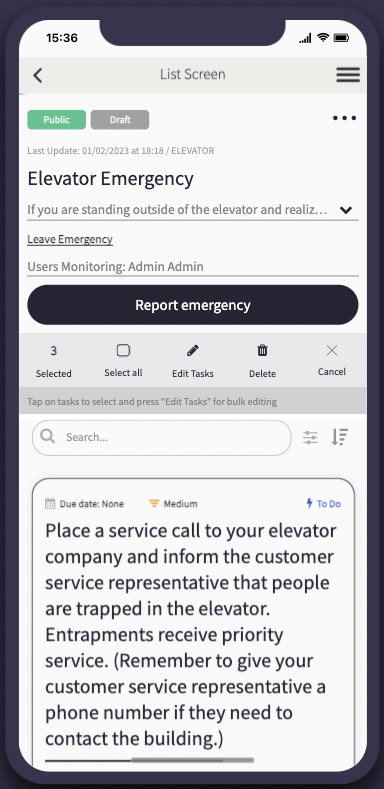
Use this function to bulk delete or update the list of tasks associated with the emergency task list
Click on the tasks you wish to update and select from the options to update; assignee, status, priority, and due date - Reports
Manage organization and users
- Users and organizations screen
All users of the app will belong to an organization and will see relevant information tied only to that organization.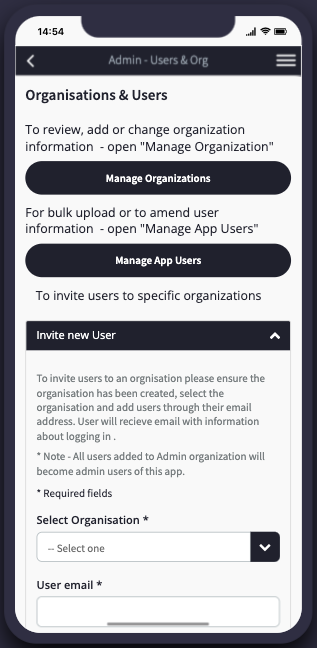
Regular users can manage their own organization from this screen.
Admins can use this screen to add, edit or delete organizations. Choose between the option to bulk upload a CSV file or edit an individual user.
Preparation and training
- Resources, quizzes, and glossary
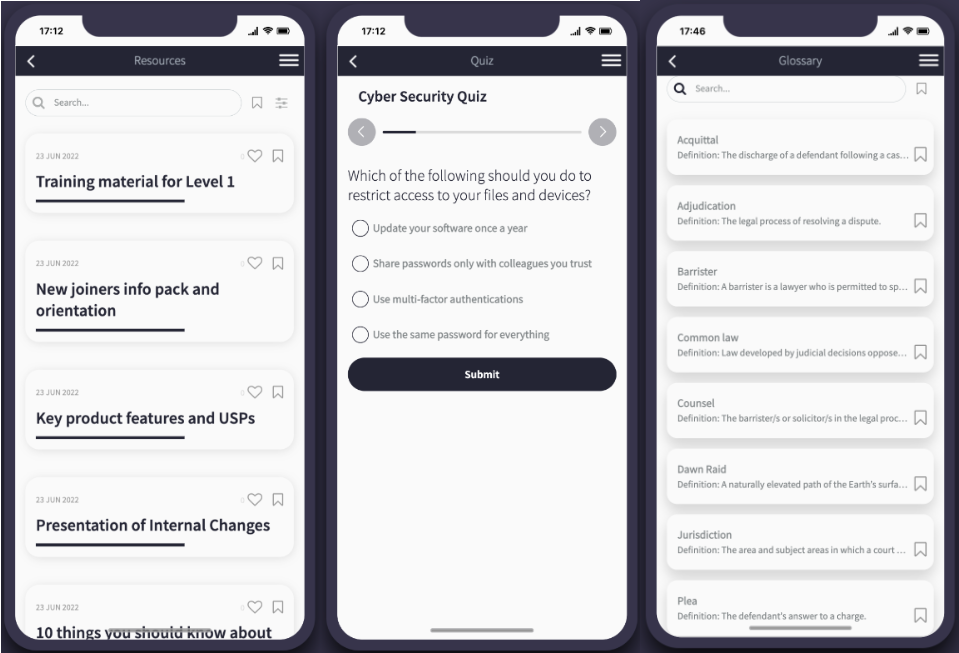
Using the resources, quiz, and glossary screens, users can prepare for an emergency situation.
- The resources screen can be used to provide preparedness information such as pdfs, videos, or links to other resources
- Using the quiz screen, create quizzes to check the knowledge of users and staff within the organization
- And enable users to understand legal jargon etc using the glossary
These screens can be accessed from the app home screen.
User roles
User role overview
|
User role |
Definition |
User specific features |
|
Admin |
Admin can be set up as an admin for an internal organization or an admin for clients |
|
|
Regular user |
Users can be non-admin users in your organization or clients that will be using the template you provide |
|
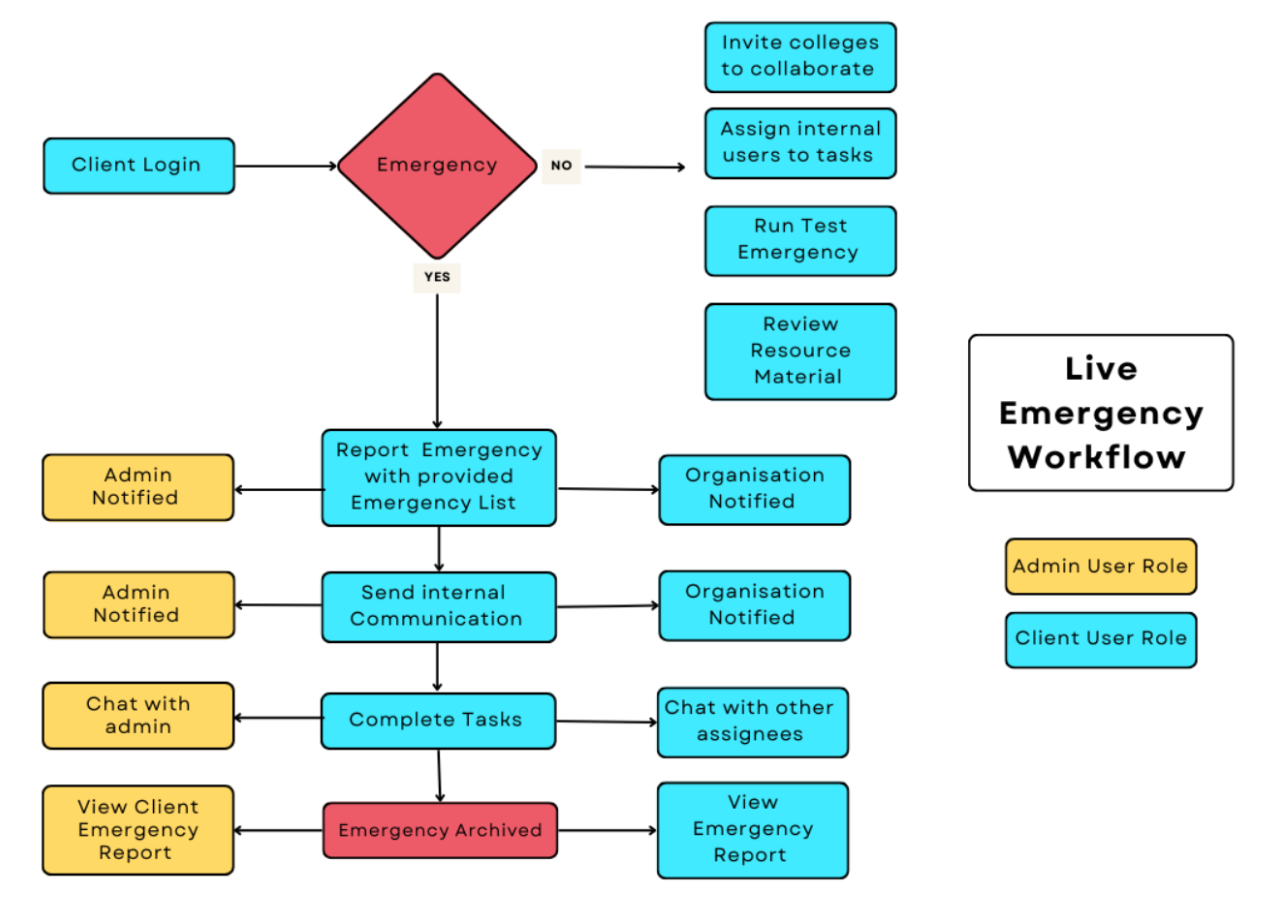
Workflow overview
The following images detail the workflow of the Emergency Management solution
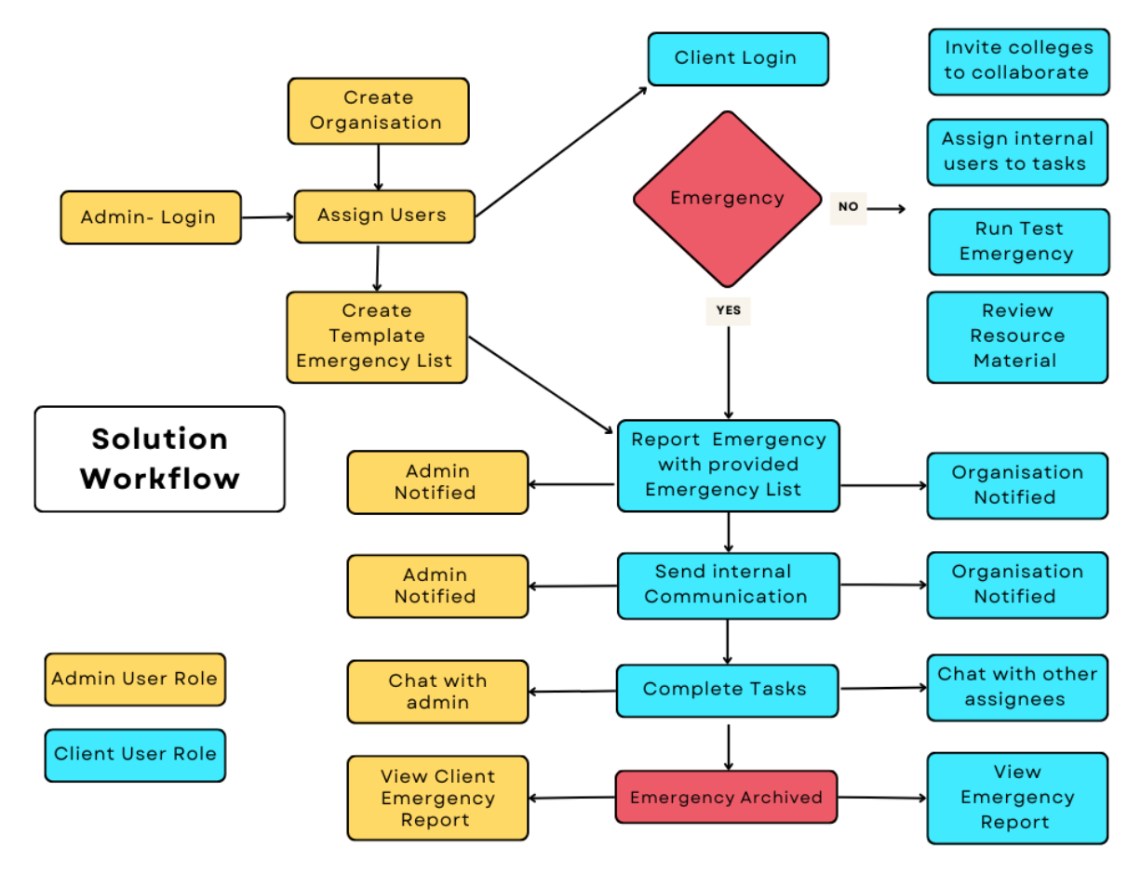
Solution set up
In this section, we will highlight the two different user types of this solution and take you through the main features relating to each user role. Instructions will detail the usage of the app as each user
Regular users
- Home screen
- How to report an emergency
- How to run a drill or test emergency
- How to create an emergency action list
- How to manage your emergency task dashboard
- How to set up a public emergency
- My organization
Home screen
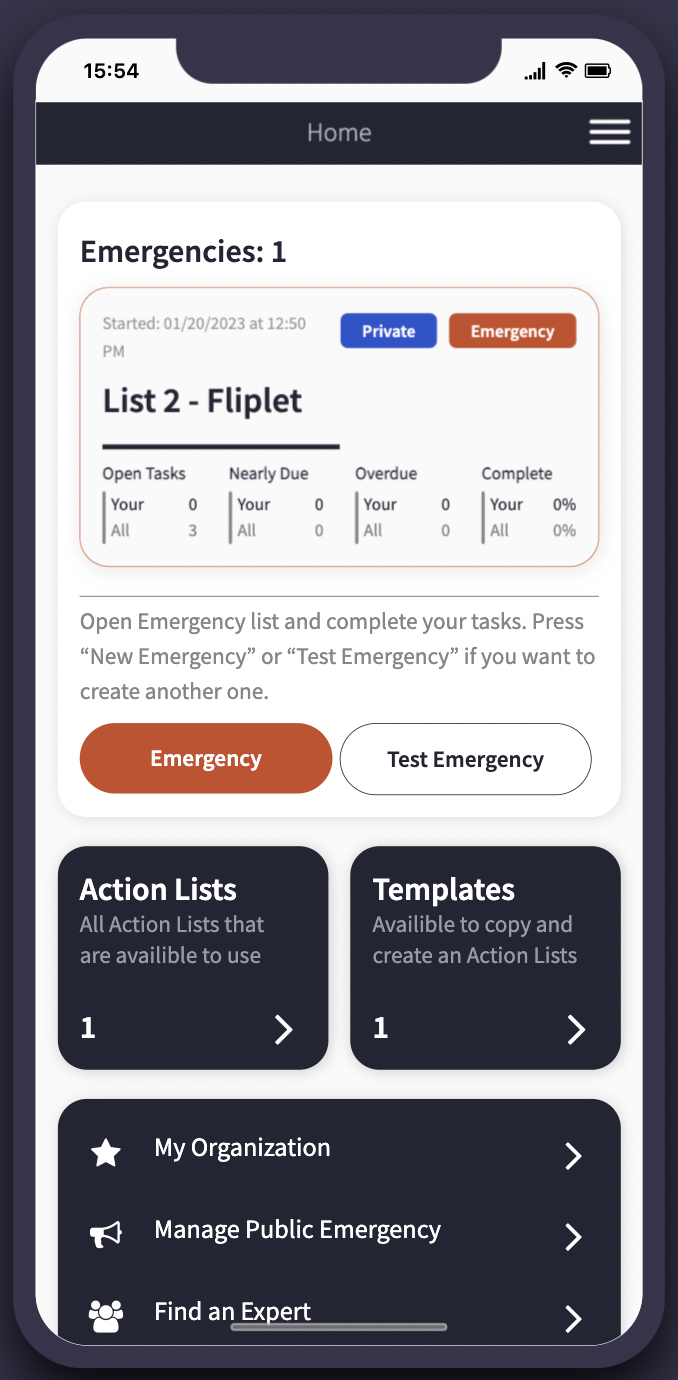
This screen gives an overview of what is happening within the organization. From this main dashboard, users can report emergencies and be notified of any live emergencies and related tasks assigned to them.
How to report an emergency
- First, select the “emergency” button on the home screen
- User will be prompted to “make a copy” of a template emergency list or create a new emergency
- Make a copy – select from a list of templated emergency lists created by the app admin
- Create new – create an emergency action list from scratch (see instructions below)
- Next, update the status on the selected emergency task list from “draft” to “live” and click save
- When an emergency is set live, all users assigned to the emergency action list and any associated admins will receive a notification alerting them to the emergency
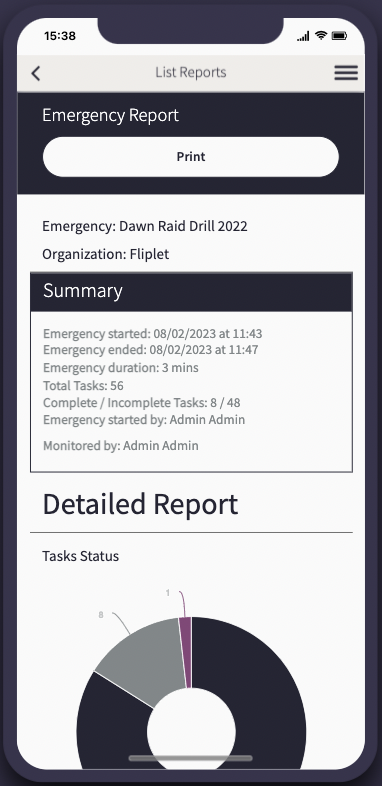
- Once the emergency and associated tasks are completed, update the status from “live” to “archived”
- Following this, users will be prompted to fill out an after emergency survey
- A report of the emergency data can be found in the “reports” tab of the archived incident
How to run a drill or test emergency
This will allow you to test your emergency workflow, but no Admin users will be notified of the emergency
- First, select the “test emergency” button on the home screen
- User will be prompted to “make a copy” of a template emergency list or create a new emergency
- Make a copy – select from a list of templated emergency lists created by the app admin
- Create new – create an emergency task list from scratch (see instructions below)
- Next, update the status on the selected emergency task list from “draft” or to “live” and click save
- Once the emergency and associated tasks are completed, update the status from “live” to “archived”
- Following this, users will be prompted to fill out an after emergency survey
- A report of the emergency data can be found in the “reports” tab of the archived incident
How to create an emergency action list
- First, select “action lists” from the home screen
- Select “create new draft”
- Choose “create new” and then select “create” to start editing
- Give your emergency action list a title
- Give your emergency a description
- Set List state
- Draft – default state for creating and editing
- Emergency – there is a live emergency and all assigned users will receive notifications about tasks that are assigned
- Archive – emergency has ended
- Set list status
- Private – only users that are assigned tasks have access
- Public – all users within your organization have access
- Template – admin created action list visible to all organizations. These lists are created to be copied and tailored by the organization and cannot have an assignee
- The following can be used to collect information from users before and after an emergency. They are optional when creating your emergency task lists.
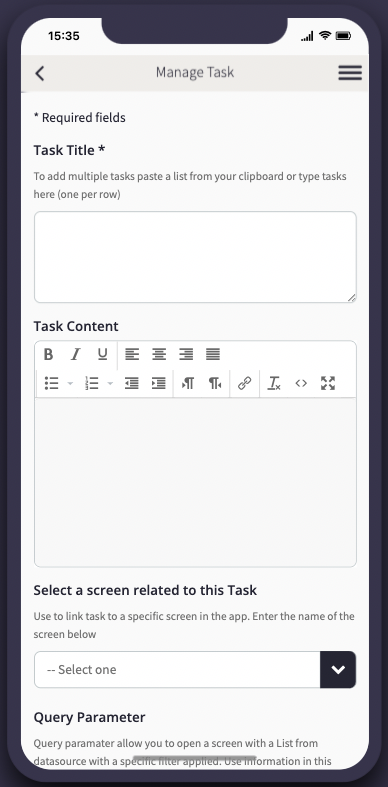
The forms below should be edited through Studio edit mode. If you wish to configure your emergency action list, input the screen name under the following form fields.- Intake form – the intake form will prompt users that report a live emergency to complete it prior to submission. All information from the intake form will be shown in the list description field and will be visible to all assignees. Use this form, only if you need to collect additional and essential information about an emergency
- After emergency survey form – if this form is attached all users will be required to complete it, after the Emergency is set to “Archive”. All answers will be shown in the emergency dashboard under reports
- Show in list of public emergencies – this list title will be available in the public emergencies dropdown. The list should be set to “Draft/Public”. For more information open the manage public emergencies screen
How to manage your emergency task dashboard
- Add task
Use this function to add new tasks to the emergency task list
Add a title, description, and priority. Optionally, assign the emergency to someone in your organization and set a deadline - Reorder
Use this function to reorder tasks in your Emergency task list by dragging and dropping them in the correct order on your device screen - Multi-select
Use this function to bulk delete or update the list of tasks associated with the emergency task list
Click on the tasks you wish to update and select from the options to update; assignee, status, priority, and due date - Reports
How to set up a public emergency
Public emergencies can be used for users outside of your business to report an emergency within your place of business or organization. An organization can generate a QR code that when scanned will open a screen with a list of public emergencies.
Public users can scan the QR code and select the relevant type of emergency. If this emergency also has an intake form, the user will be required to complete it.
Public users cannot see any additional information, they will only be able to select the emergency type and complete the form.
- On the home screen select “action lists”
- Choose “create new draft” and select “create new”
- Give your list a title, description, category, and image
- Once complete, select save
- Next, add and assign any tasks to users that need to act in this type of public emergency
- Return to the list and select “…”, and then select edit
- Update the list’s status from “draft” to “public”
- Select “intake form” and ensure this form collects the relevant information. If not – an admin will need to change or create a new form
- Select “show in list of public Emergencies”
- Save
- This list will now be visible in the list of public emergencies
My Organization
This screen is used to invite users to your organization or edit existing users
- Invite users – to invite a user to the organization enter the email address of the user and select the “invite user” button. Users will receive an email notifying them that they have been invited to join the organization, a temporary password, and instructions for logging in for the first time.
- Edit users – click into the list view of the person you are wishing to edit. Click on the “Edit” button. Edit required for fields. Save
Admin users
- Manage organizations
- Manage app users
- Invite new user
- Admin – emergencies and emergency action lists
- Admin – how to create an emergency task list
- Admin – how to manage your emergency task dashboard
- Admin – how to send notifications
Manage organizations
Navigate to the “users & organizations” screen from the main menu. Here you will see three options:

- Manage organizations
- Manage app users
- Invite new user
All users of the app will belong to an organization and will see relevant information tied only to that organization. This can be used in a few different ways depending on the intended use case of the solution.
-
- Internally – all users exist under one organization
- Internally – organizations are seen as different parts of your internal business
- E.g – IT, HR, Partners, Associates
- London office, USA office, Asia office
- Externally – organizations are clients of your business
- E.g – Fliplet, Apple, Google
Add, edit, or delete organizations
- Select the “manage organizations” option
- Click the + button in the bottom right corner to add or click into the list view of the organization to edit or delete.
- Contact person – you will be asked to designate one “Contact person” when creating the organization. This person will need to be added separately to the organization as a user (see steps below)
- Admin organization – you will be asked to set one admin organization for the solution as a whole. From the above list, this can be a specific team within your own organization, or your organization if this solution is being used for external clients. Note: all users added to this admin organization will become admin users of the app.
- Manage my organization – use this option to manage people within your own organization
Manage app users
This option is used to edit individual users of different organizations within the app. From this screen, users have the option to bulk upload a CSV file or edit an individual user.
- Bulk upload – admin users can use this screen to bulk upload data into a data source. In the settings of the form select the data source your upload should be added to
Note: column names must match the column names in the data source you are uploading to - Edit users – click into the list view of the user you want to edit. Click on the “Edit” button. Edit required for fields. Save
- Delete users – to permanently delete users from the app, click on the list view of the user you want to delete. Click on the “Delete” button. Once deleted they will no longer be able to access the app
Invite new user
This option is used to invite users to specific organizations.
- Select the organization and add users using their email addresses
- The user will receive an email with their login information
- Note: All users added to the admin organization will become admin users of the app
Admin – emergencies and emergency action lists
Before you start please consider the following
- If an admin creates an emergency template it is visible to all organizations
- To create a specific list for a specific organization, the admin should create a private list and assign users from this organization to tasks
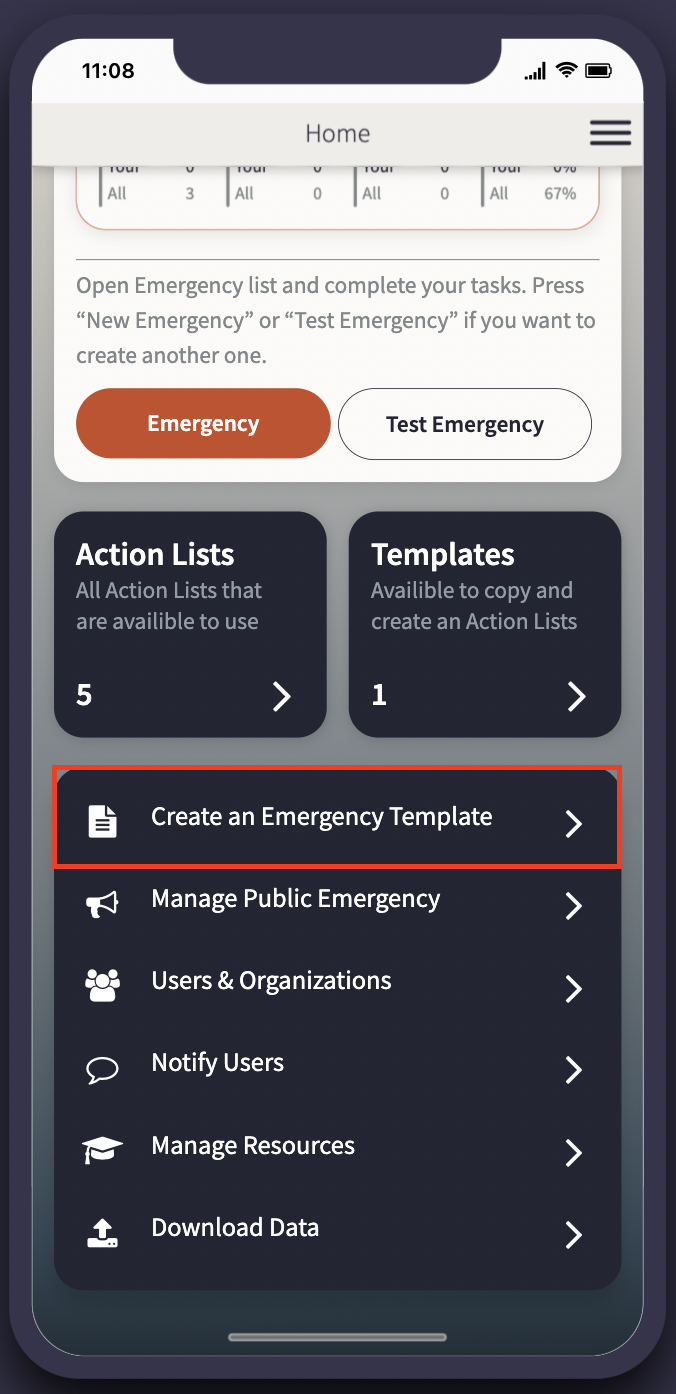
Admin – how to create an emergency task list
- Select “create an emergency template” from the home screen
- Select “create new”, and then choose the create button to start editing
- Give your emergency action list a title and a description
- Set the list state
- Draft – default state for creating and editing, no users can see this list
- Emergency – there is a live emergency and all assigned users will receive notifications about tasks that are assigned
- Archive – the emergency has ended
- Set the action list type
- Private – only users that are assigned to tasks have access
- Public – all users within your organization have access
- Template – admin created action list visible to all organizations. These lists are created to be copied and tailored by the organization and cannot have an assignee
- The following forms can be used to collect information from users before and after an emergency. They are optional when creating your emergency task lists.
Each form should be edited through Studio in Edit mode. If you want to configure your emergency task list, input the screen name under the following form fields.- Intake form – the intake form will prompt users that report a live emergency to complete it prior to submission. All information from the intake form will be shown in the list description field and will be visible to all assignees. Use this form, only if you need to collect additional and important information about an emergency.
- After emergency survey form – if this form is attached all users will be required to complete it after the Emergency is set to “Archive”. All answers will be shown in the emergency dashboard under reports
- Show in list of public emergencies – this list title will be available in the public emergencies dropdown. The list should be set to “Draft/Public”. For more information open the manage public emergencies screen
- Select organization – use this option to assign this emergency task list to a specific team or client listed in your organization list.
Admin – how to manage your emergency task dashboard
- Add task
Use this function to add new tasks to the emergency task list- Add a title, description, and priority. Optionally assign it to someone in your organization and set a deadline
- Reorder
Use this function to reorder tasks in your emergency task list using drag and drop to get the correct order on your device screen - Multi-select
Use this function to bulk delete or update a list of tasks associated with the emergency task list- Click on the tasks you want to update and select from the options to update; assignee, status, priority, and due date
- Reports
View reports on the emergency - Watching
Admins can choose to “watch” an emergency task list in order to receive notifications and status updates when a live emergency is reported and tasks are completed in the list. Use “stop watching” to stop notifications.
Admin – how to send notifications
- Admins can use the communications screens to keep users informed before, during, or after an emergency by sending suitable email, push, and SMS notifications
- This form has the option to submit, save, send a test, or send to users
- If you select to save this draft can be viewed and edited from the manage communication screen
- If you select to send a test, this will be sent to you to view
- This screen allows you to view previously sent communications or saved communications
- Select the communication to view, and click duplicate to load the edit communication form with the communication detail prefilled
- These screens use the list from data source and the form components. Click to learn more
Additional information
Template definitions
- Template – pre-built list of tasks that are not assigned to anybody. A template can only be created by admins and will be visible within all organizations and users. Regular users cannot change a template, only review and make a copy. After a user creates a copy of the template, it becomes a regular list. It can be used for real or test emergencies
- Emergency – a list of tasks that are created (from a template or new) and needs to be completed by users that have assigned tasks. All users that have tasks will receive notifications when an emergency begins. All admins will be also notified about the emergency, even if it’s inside a different organization
- Organization – this app can be used by different organizations (firms, companies, offices) that will only see their own organization’s data. Admin users can see and manage emergencies within all organizations
- Intake form – a form that is attached to the emergency list. If the list has this form, the user will need to complete it, before setting the emergency live. All information from the intake form will be added in to the list description. For example, if you have an emergency list for people who are stuck in a lift. In the intake form, you can ask what happened and when and the name and contact number of the person. After this form is completed – an emergency is created automatically and will include this additional information
Emergency state and status:
- Draft / Private – only visible to users who created the list. Use this state while the list is not ready
- Draft / Public – visible to all users + admins. Notifications are disabled. Users can see it in the “My Lists” section
- Emergency / Private – visible to users that are assigned to at least 1 task in this list and admins. All assigned users will be notified of the emergency
- Emergency / Public – visible to all users inside the organization and admins. All assigned users will be notified of the emergency
- Archive / Private – visible to users that are assigned to at least 1 task in this list and admins
- Archive / Public – visible to all users inside the organization and admins
Related articles