Precursor
The app must be completed and follow Apple’s review guidelines. Apps that do not look complete or don’t follow the guidelines will be rejected. Read Apple’s guidelines here.
Get Started
Apple’s unlisted app distribution option can be used for apps that are not meant for public distribution. By using this option, your app will be published as unlisted on the App Store. This means it will not appear in search results, but it can be accessed by anyone with the link. You can learn more about unlisted app distribution here.
Since the app is available to anyone with the link, consider adding security features to prevent unauthorized access.
You will need to have an Apple developer account to publish your app as an unlisted app on the App Store. Learn more about how to get an account here.
This article details the steps you need to take to publish your app as unlisted on the App Store once your developer account is set up.
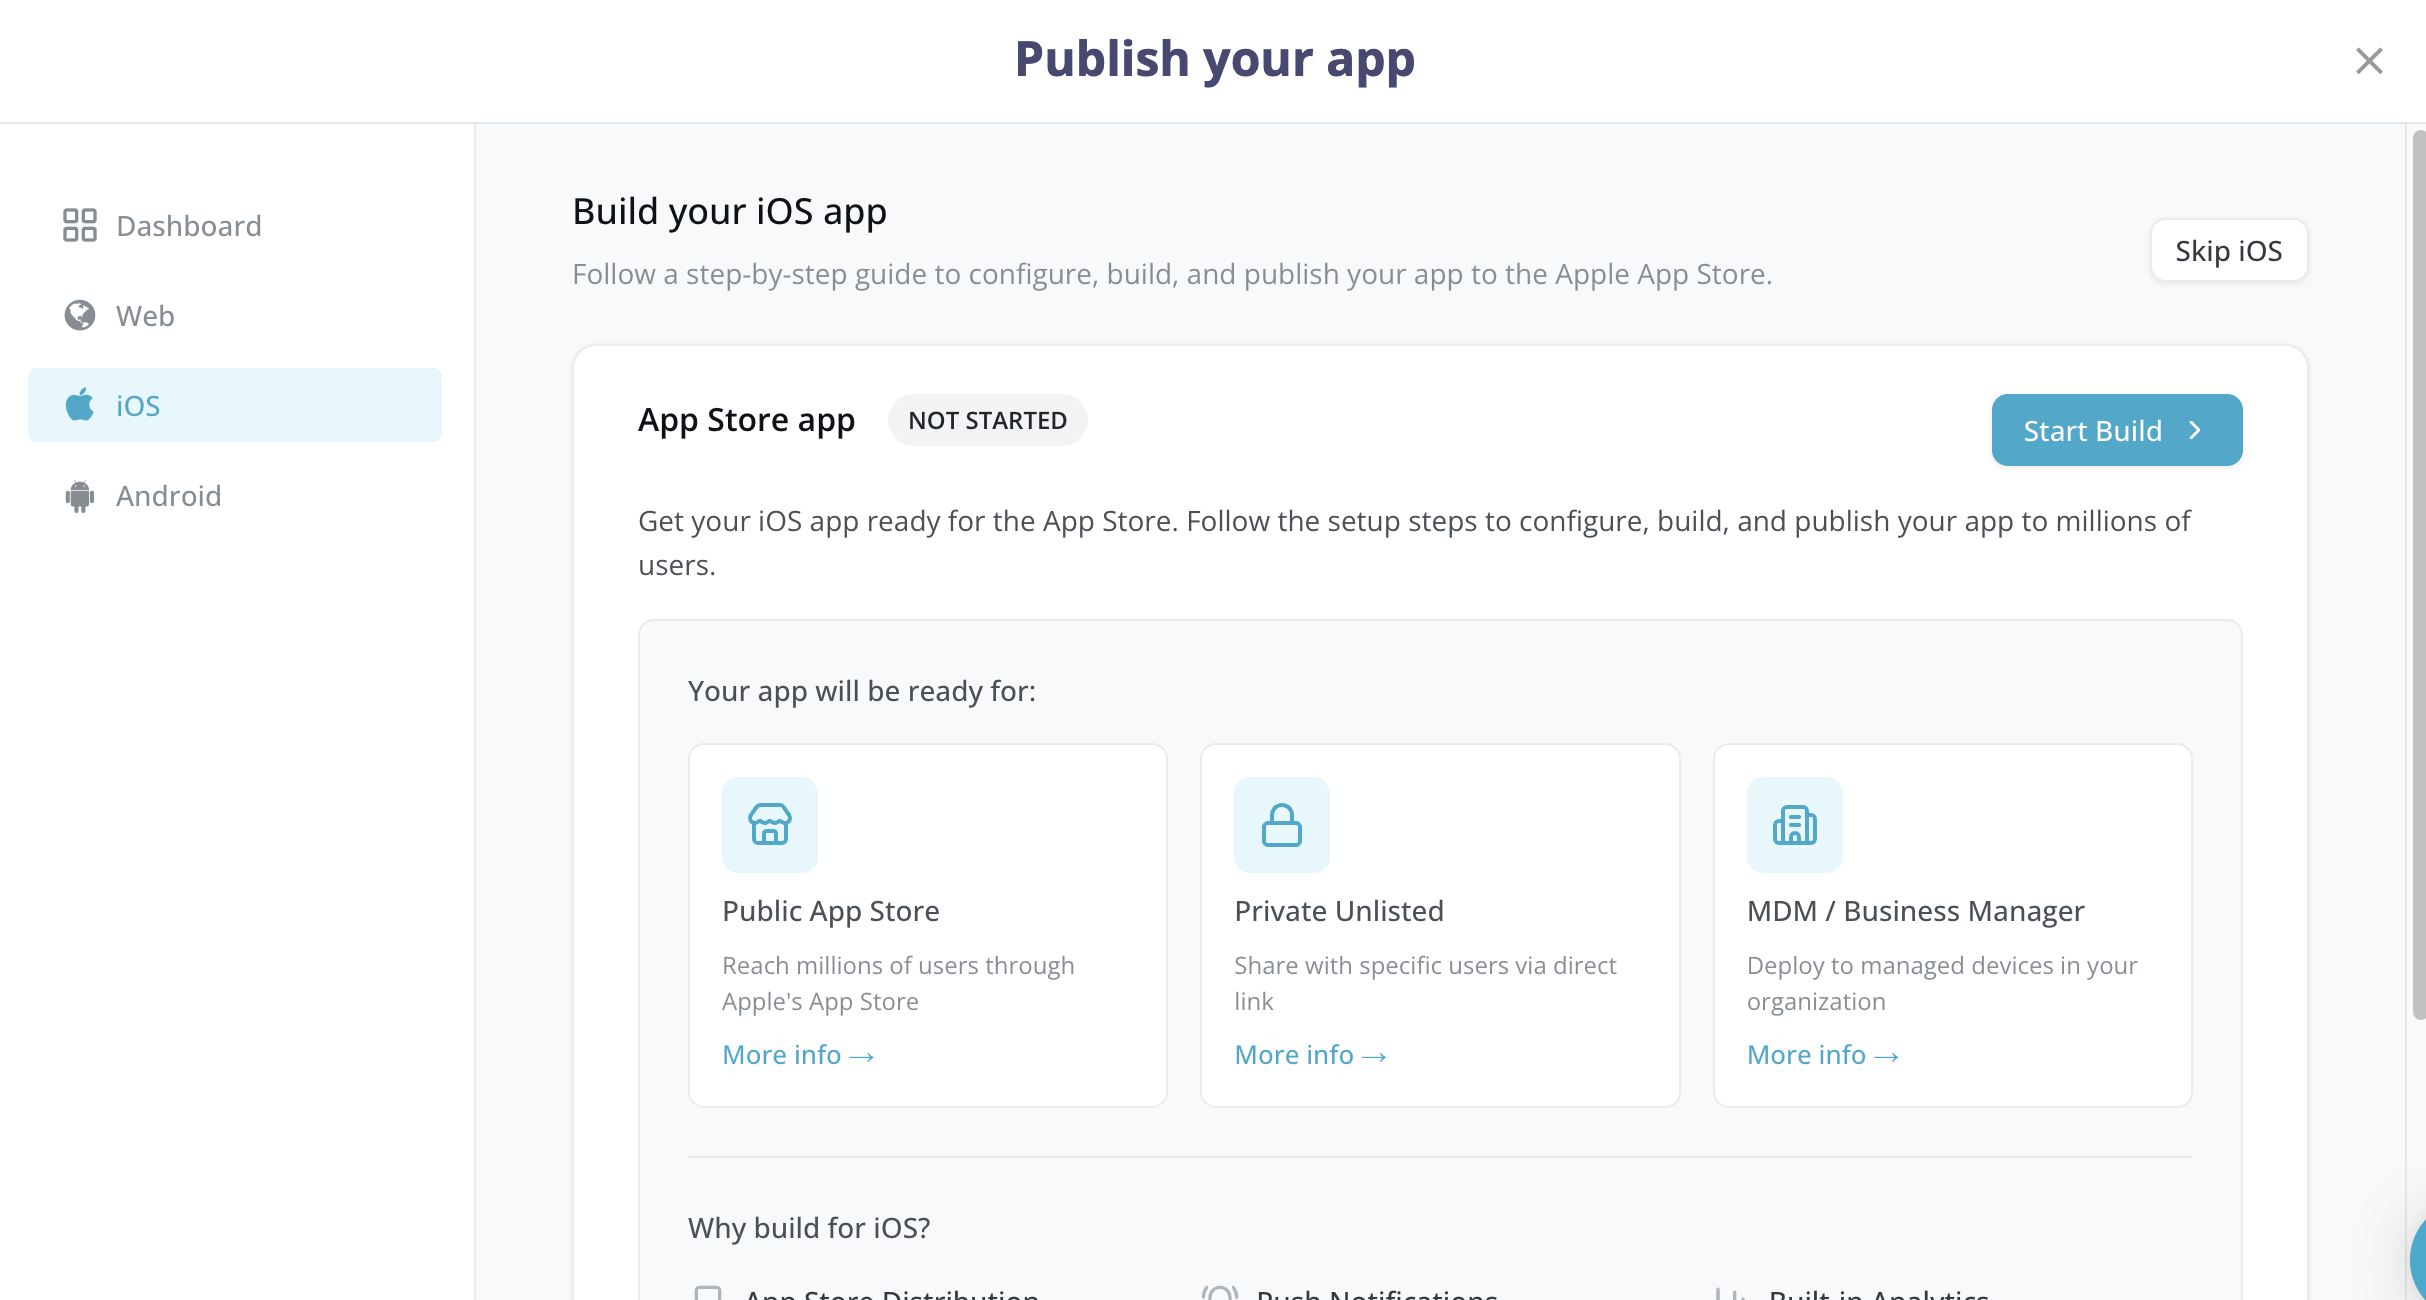
Open the Publishing Dashboard
- Open your app in Fliplet Studio.
- Go to the Publishing Dashboard.
- Click the iOS card or select iOS from the sidebar. You land on the iOS Publishing Dashboard, which shows the current status of your iOS app (Not Started, Draft, In Progress, Built, or Failed).
- Click Start Build (for first-time builds) or Continue Setup / Rebuild App (for subsequent builds). This opens the iOS publishing flow — a 6-step guided wizard.
Step 1: App Store Connect setup
This step ensures your app exists in Apple’s system before Fliplet builds it.
- Go to developer.apple.com.
- Sign in to your account.
- Open Certificates, Identifiers & Profiles.
- Select Identifiers.
- Click the + button.
- Select App IDs.
- Select App.
- Enter an explicit Bundle ID (e.g.,
com.yourcompany.yourapp) and click Register. - Go to App Store Connect.
- Click My Apps.
- Click the + button.
- Select New App.
- Fill in your app details:
- Select iOS as the platform.
- Enter your app name.
- Select the Bundle ID you just created.
- Enter a SKU.
- Click Create.
- Return to Fliplet’s Publishing Dashboard and click Continue.
You don’t need to create a new Bundle ID or app listing. Your existing Bundle ID can be found in App Store Connect or from a previous submission. Confirm the setup and proceed.
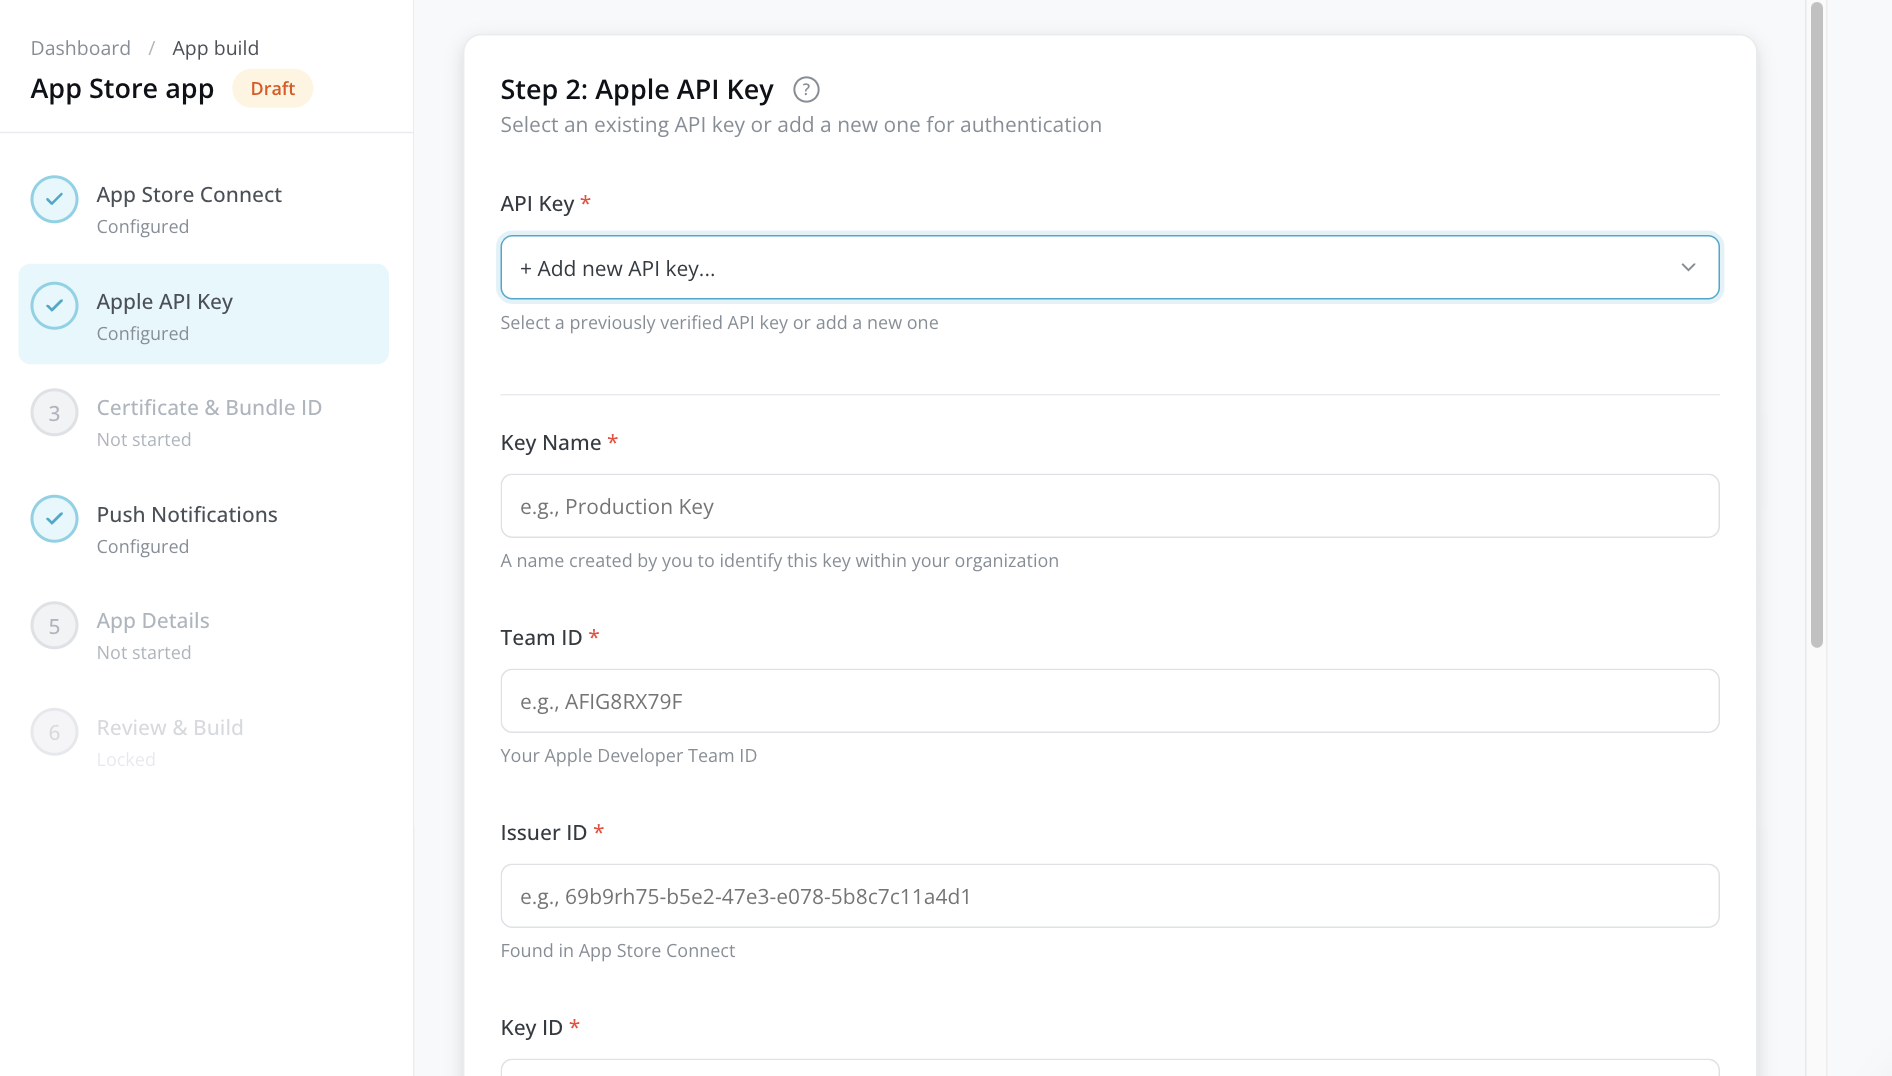
Step 2: Apple API key
The API key allows Fliplet to communicate with App Store Connect on your behalf to upload your app build.
If you already have an API key saved
- Select it from the API Key dropdown. Your key details (Key Name, Team ID, Issuer ID, Key ID) appear for confirmation.
- Click Continue.
If you need to create a key
- Go to App Store Connect.
- Click Users and Access.
- Select Integrations.
- Open App Store Connect API.
- Click + to generate a key.
- Give it a name and select App Manager access.
- Click Generate.
- Download the .p8 file immediately — you can only download it once.
- Note down the Key ID and Issuer ID shown on the page.
- Find your Team ID at developer.apple.com/account (shown in your membership details).
Back in the Publishing Dashboard, fill in:
| Field | Where to find it |
|---|---|
| Key Name | A name you choose to identify this key (e.g., “Production Key”) |
| Team ID | Your Apple Developer Team ID (e.g., AFIG8RX79F) |
| Issuer ID | Shown on the App Store Connect API keys page |
| Key ID | 10-character ID shown next to your key in App Store Connect |
| API Key Content (.p8) | Paste the entire contents of the .p8 file, including the -----BEGIN PRIVATE KEY----- header |
Click Continue. Your key is verified and securely stored for future builds.
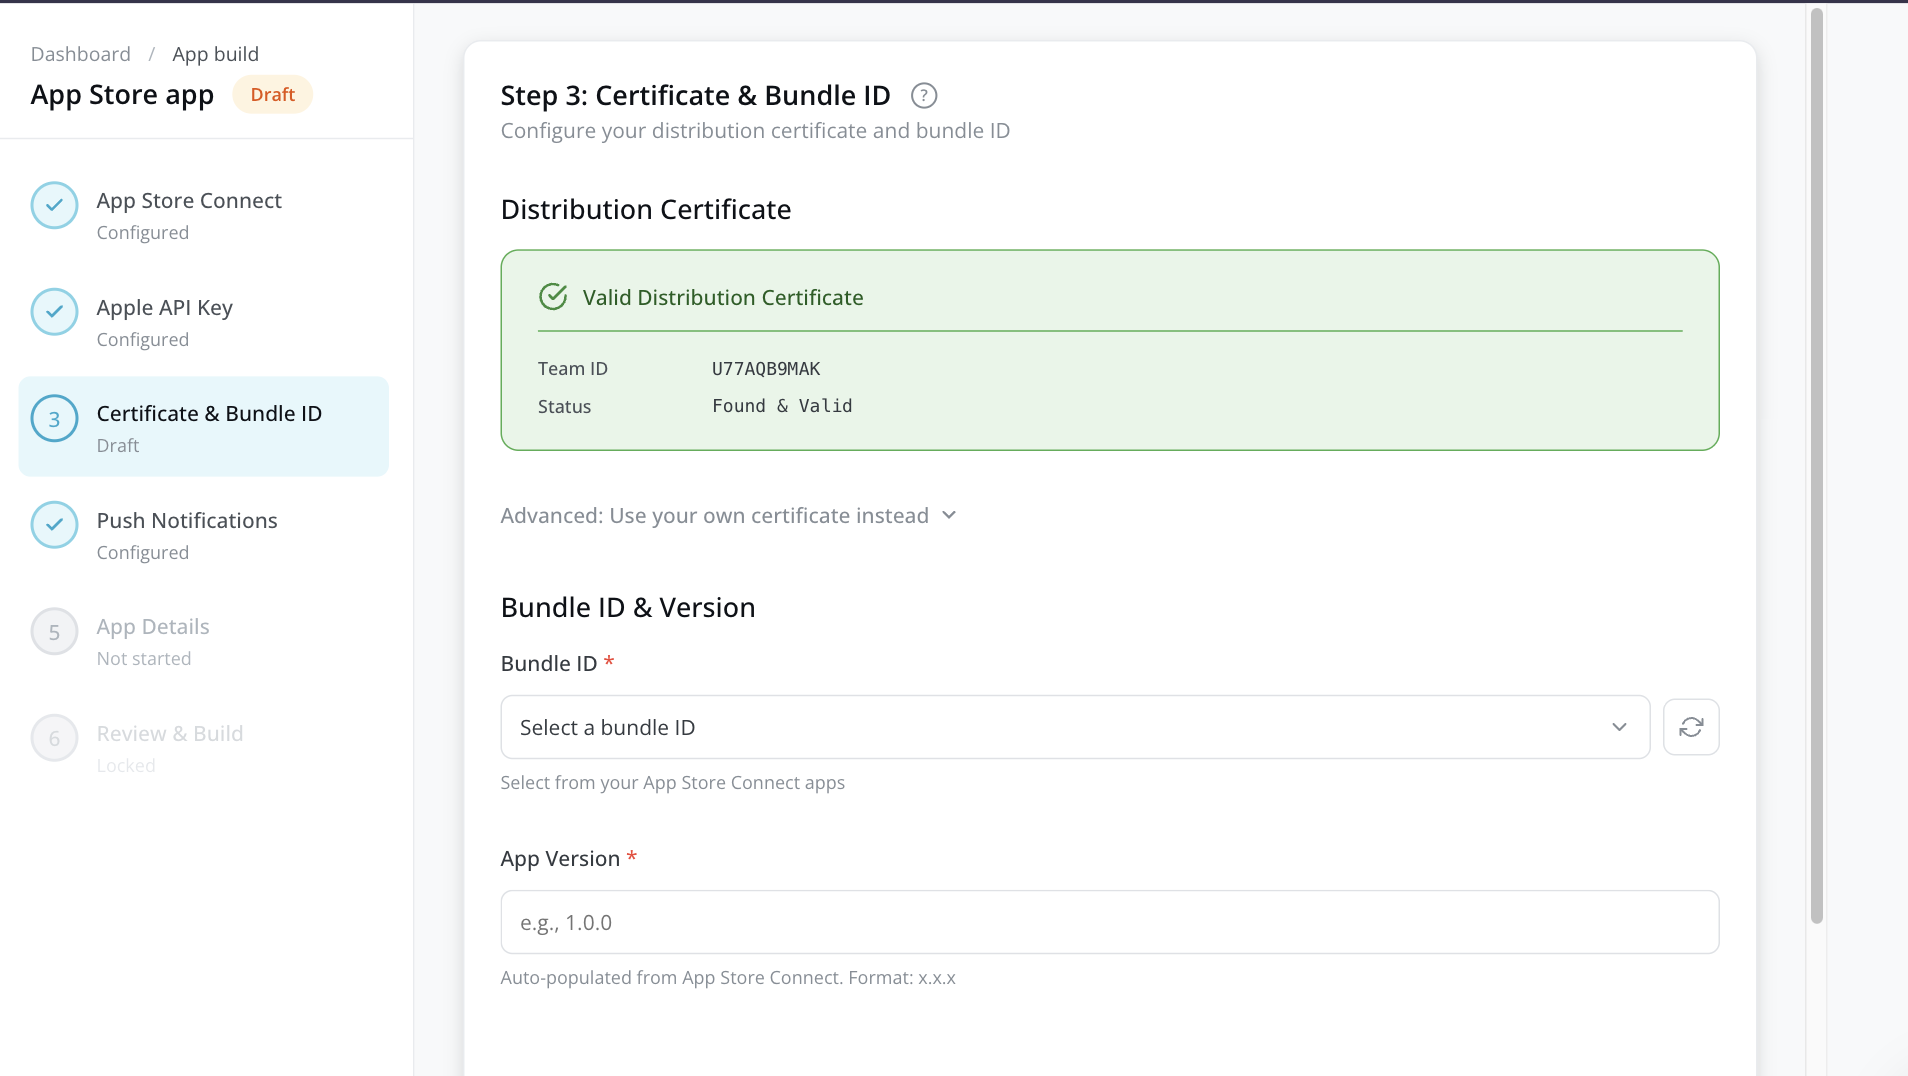
Step 3: Certificate and Bundle ID
Distribution certificate
Fliplet automatically manages your iOS distribution certificate. The system detects an existing valid certificate in your Apple Developer account or generates one for you. The certificate status displays automatically — no action is required unless you want to use your own certificate.
If you prefer to use your own certificate, expand the “Use your own certificate instead” section and upload your .p12 or .cer file (and private key if applicable).
Bundle ID
Select your app’s Bundle ID from the dropdown. This list is pulled directly from your App Store Connect account using the API key you provided in Step 2.
App version
Enter your version number in x.x.x format (e.g., 1.0.0). For updates, increase this number (e.g., 1.0.1 or 1.1.0). The field may be auto-populated based on the latest version in App Store Connect.
Click Continue.
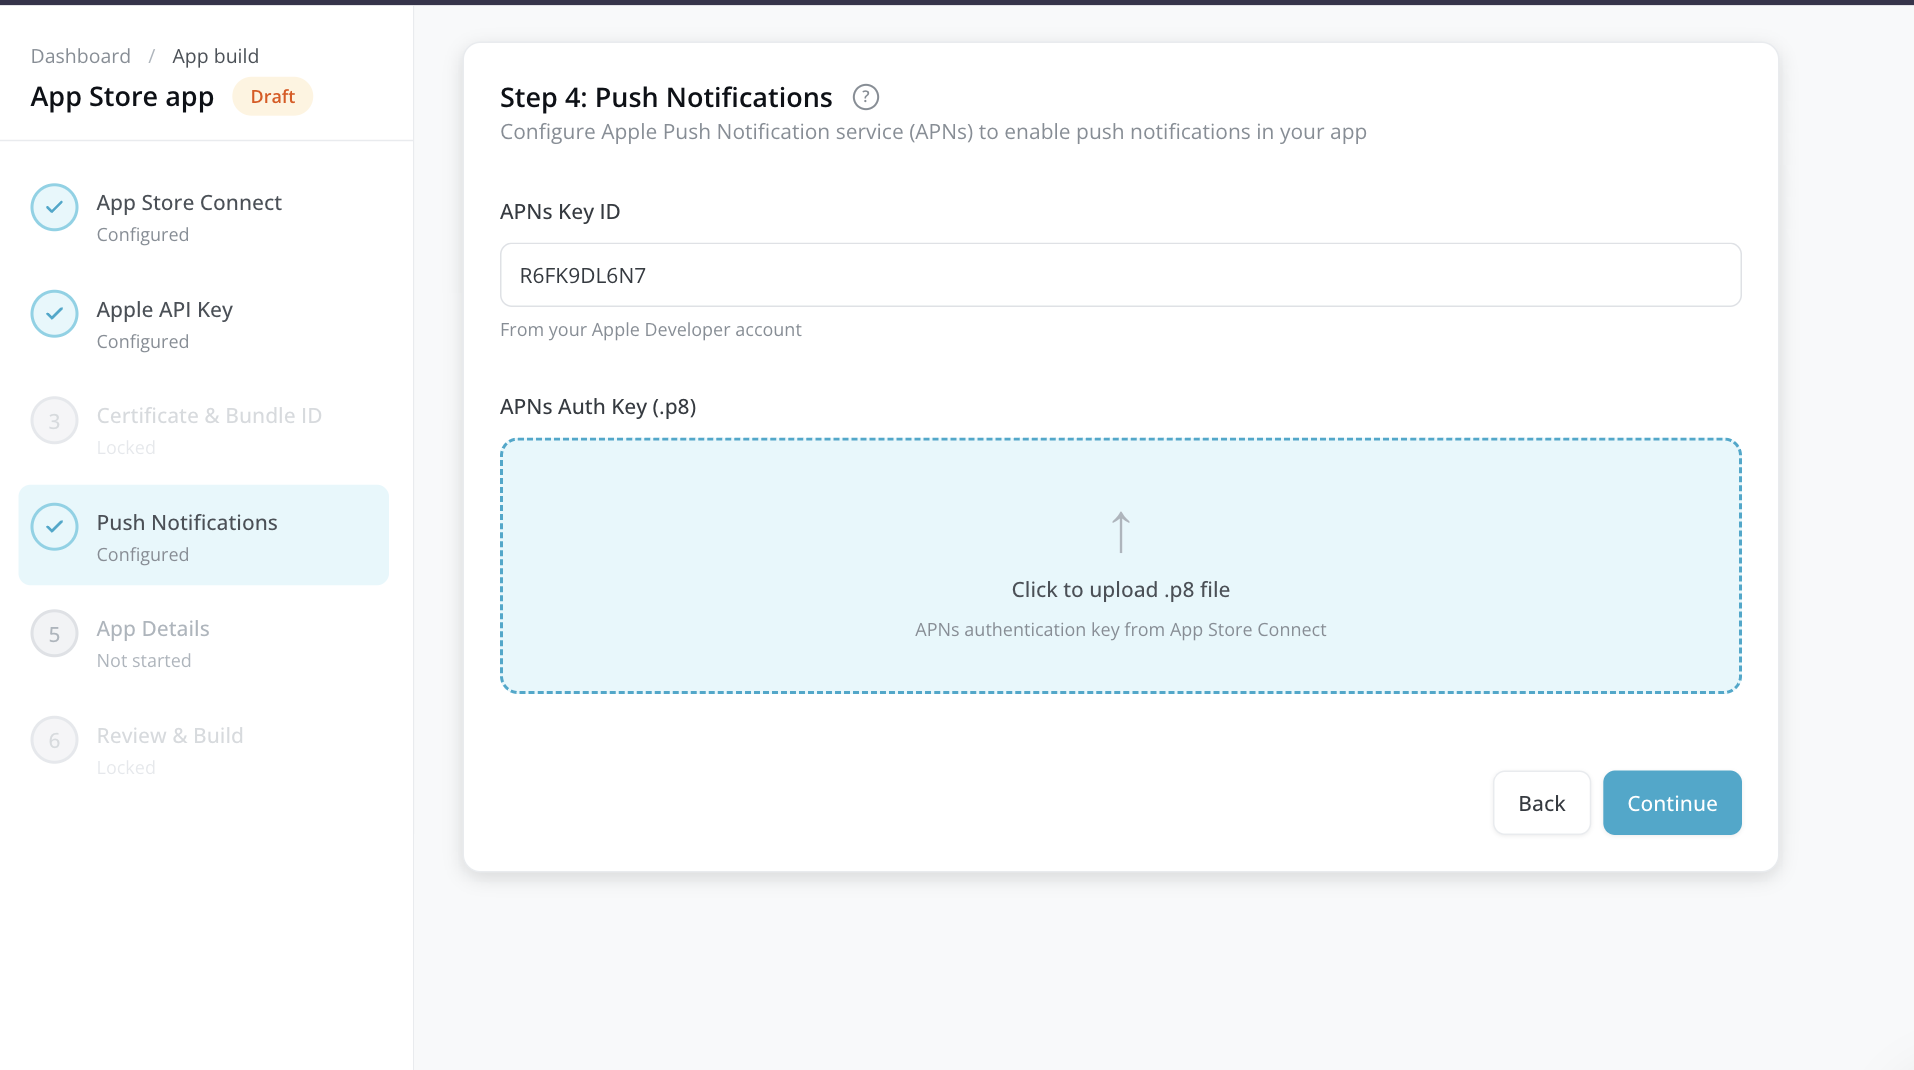
Step 4: Push notifications
Configure Apple Push Notification service (APNs) to enable push notifications in your app.
If your app uses push notifications
- In your Apple Developer account, go to Keys and create an APNs authentication key (if you don’t already have one).
- Download the
.p8file. - In the Publishing Dashboard, enter the APNs Key ID (shown next to your APNs key).
- Upload the
.p8authentication key file.
Tip: If Fliplet detects push notification settings from a previous build, you see a banner offering to reuse that configuration. Click Reuse this configuration to save time.
If your app doesn’t use push notifications
Skip this step — click Continue without entering anything.
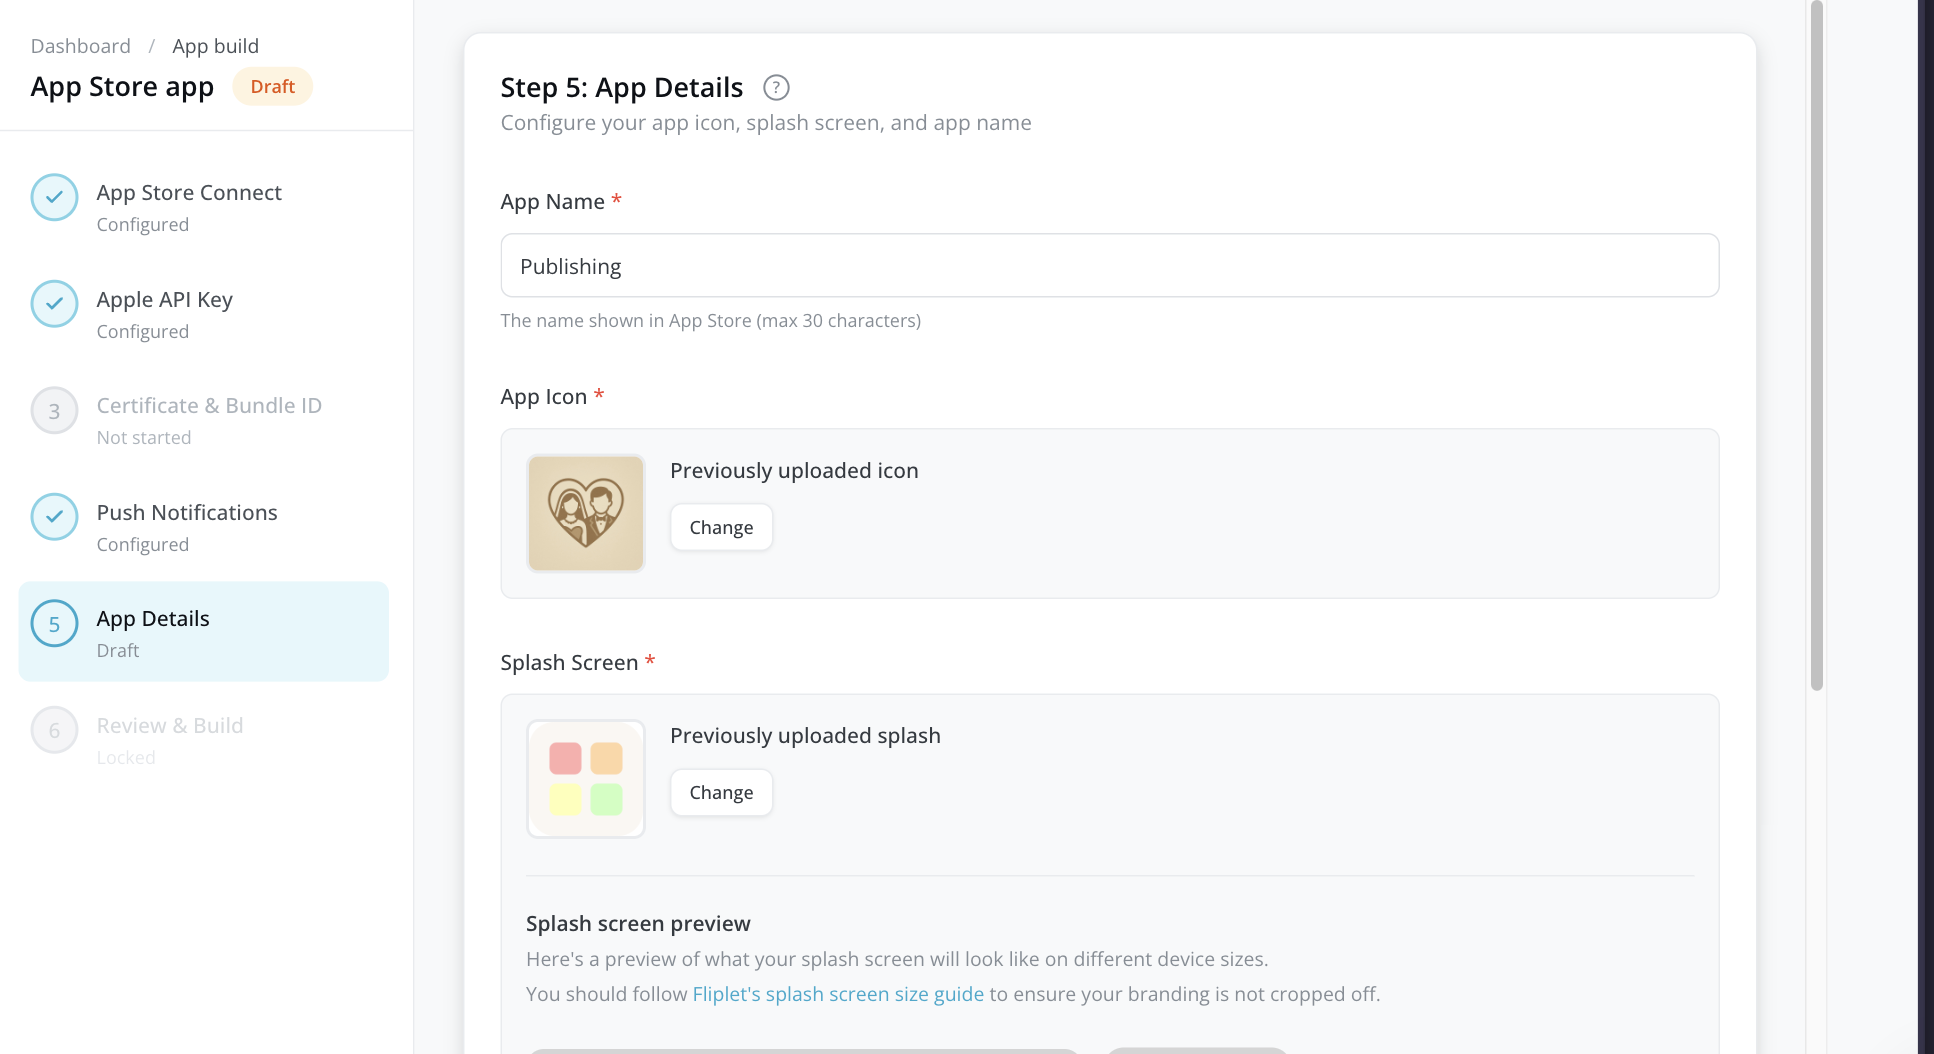
Step 5: App details
Configure how your app appears on the device.
| Field | Requirement | Details |
|---|---|---|
| App Name | Required | The name displayed under the app icon on the user’s device (max 30 characters) |
| App Icon | Required | 1024 x 1024 PNG. Shown on the home screen and in the App Store |
| Splash Screen | Required | 2048 x 2732 PNG. The image shown briefly when your app launches |
Upload your images by clicking or dragging files into the upload areas. Click Continue.
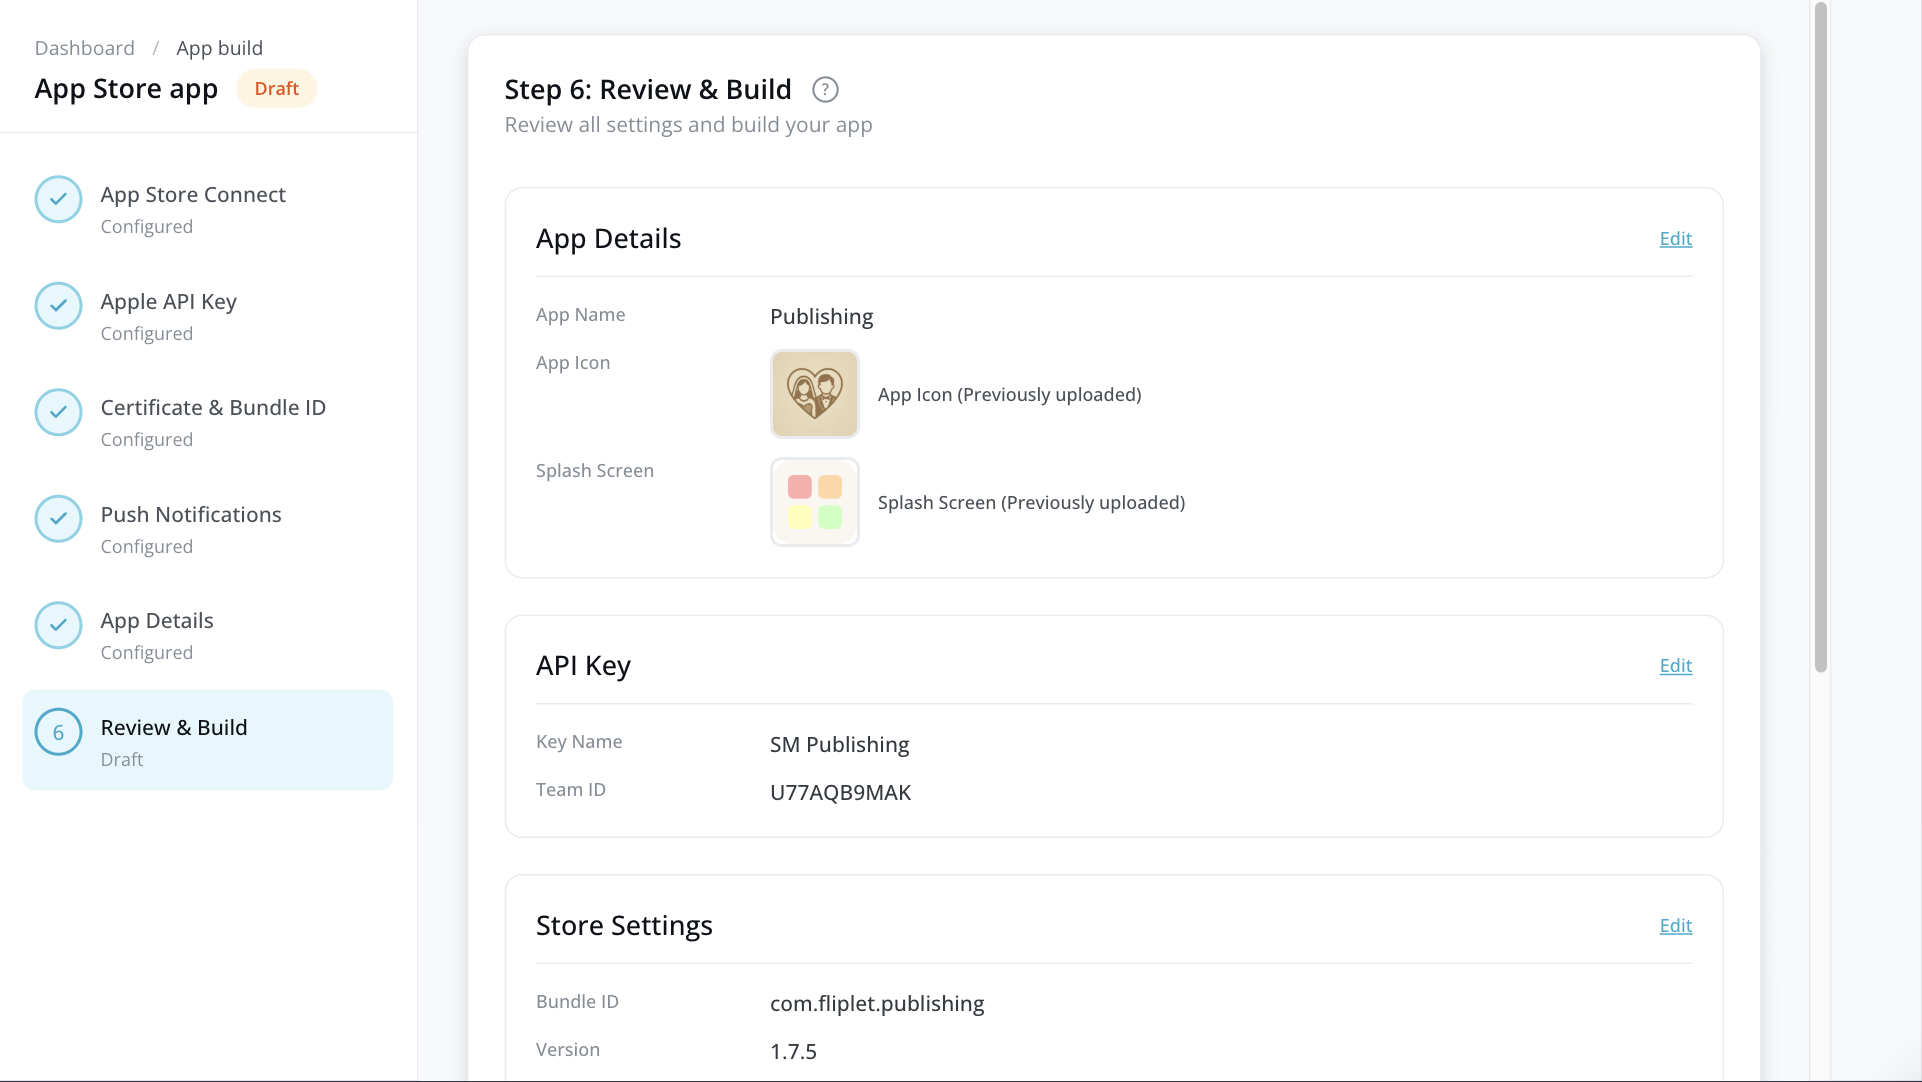
Step 6: Review and build
Review all your settings before building:
- App details — App name, icon, and splash screen
- API key — Key name and Team ID
- Store settings — Bundle ID and version number
- Certificate — Certificate status
- Push notifications — Configuration status
If anything needs changing, click the Edit link next to that section to jump back to the relevant step.
When everything looks good, click Start Build.
Step 7 – Request the app to be unlisted
- Once the app is submitted for review, you will need to fill out this form to submit a request for unlisted app distribution. These are the questions that you will need to answer:
- Describe in detail the business problem your app solves and why unlisted app distribution helps solve this problem. Please provide specific examples.
- Why do you prefer unlisted app distribution over Public distribution on the app store?
- Why do you prefer unlisted app distribution over private distribution to specific organizations via Apple Business Manager or Apple School Manager?
- Will your app be distributed internally to your employees, externally to partners/customers, or both?
- How many people will use this app?
- How many organizations will use this app?
- Who is your app designed for?
- What category best describes your app?
- Will the app be distributed to managed devices, unmanaged devices, or both?
- In what regions will your app be available?
- Apple will send you an email confirming if your app has been approved for unlisted app distribution. Keep in mind that your app will still need to go through Apple’s review process even after they have confirmed your request for unlisted app distribution has been accepted.
- Once your app is reviewed and approved by Apple, you will receive an email from Apple with a link your users can use to download the app. You can also find the URL to your app by opening your app on App Store Connect, in the “Pricing and Availability” section.
Related Articles