This guide walks you through publishing your Fliplet app to the Google Play Store using the Publishing Dashboard. By the end, your app is built and ready for you to complete the remaining details and submit for Google’s review.
Contents
- Before you start
- Open the Publishing Dashboard
- Step 1: Google Play Console setup
- Step 2: Bundle ID and keystore
- Step 3: Push notifications (optional)
- Step 4: App details
- Step 5: Review and build
- What happens during the build
- After the build
- Publish an update
- Troubleshooting
- Quick reference
Before you start
Make sure you have the following ready:
| Requirement | Details |
|---|---|
| Google Play Developer Account | Enrolled in the Google Play Developer Program ($25 one-time fee). Sign up here |
| Google Play Console access | Admin or Release Manager role in Google Play Console |
| App icon | 512 x 512 PNG image, no transparency |
| Splash screen | Image displayed when your app launches |
Tip: If you are publishing an update, most settings are saved from your previous build. You only need to change the version number and any details that differ.
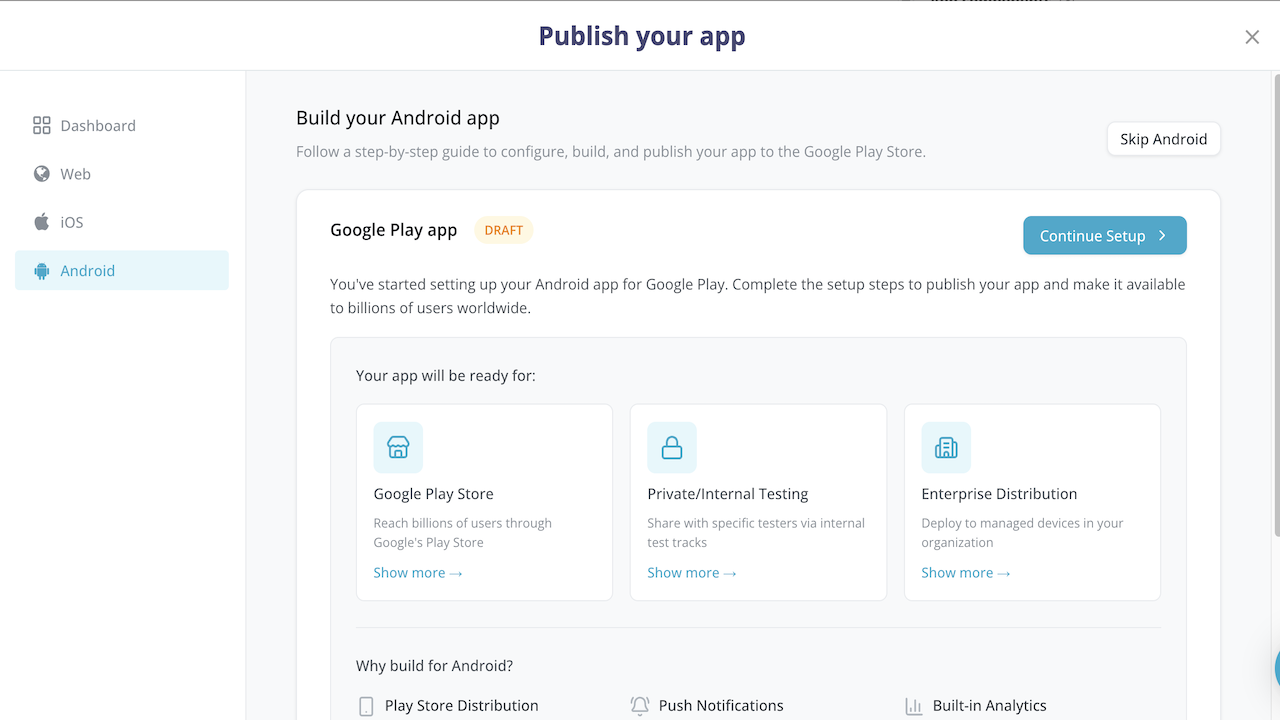
Open the Publishing Dashboard
- Open your app in Fliplet Studio
- Go to Publish
- Click the Android card or select Android from the sidebar
The Android Publishing Dashboard displays the current status of your app: Not Started, Draft, In Progress, Built, or Failed.
- Click Start Build for a first-time build, or Continue Setup / Rebuild App for subsequent builds
This opens the Android publishing flow — a 5-step guided setup.
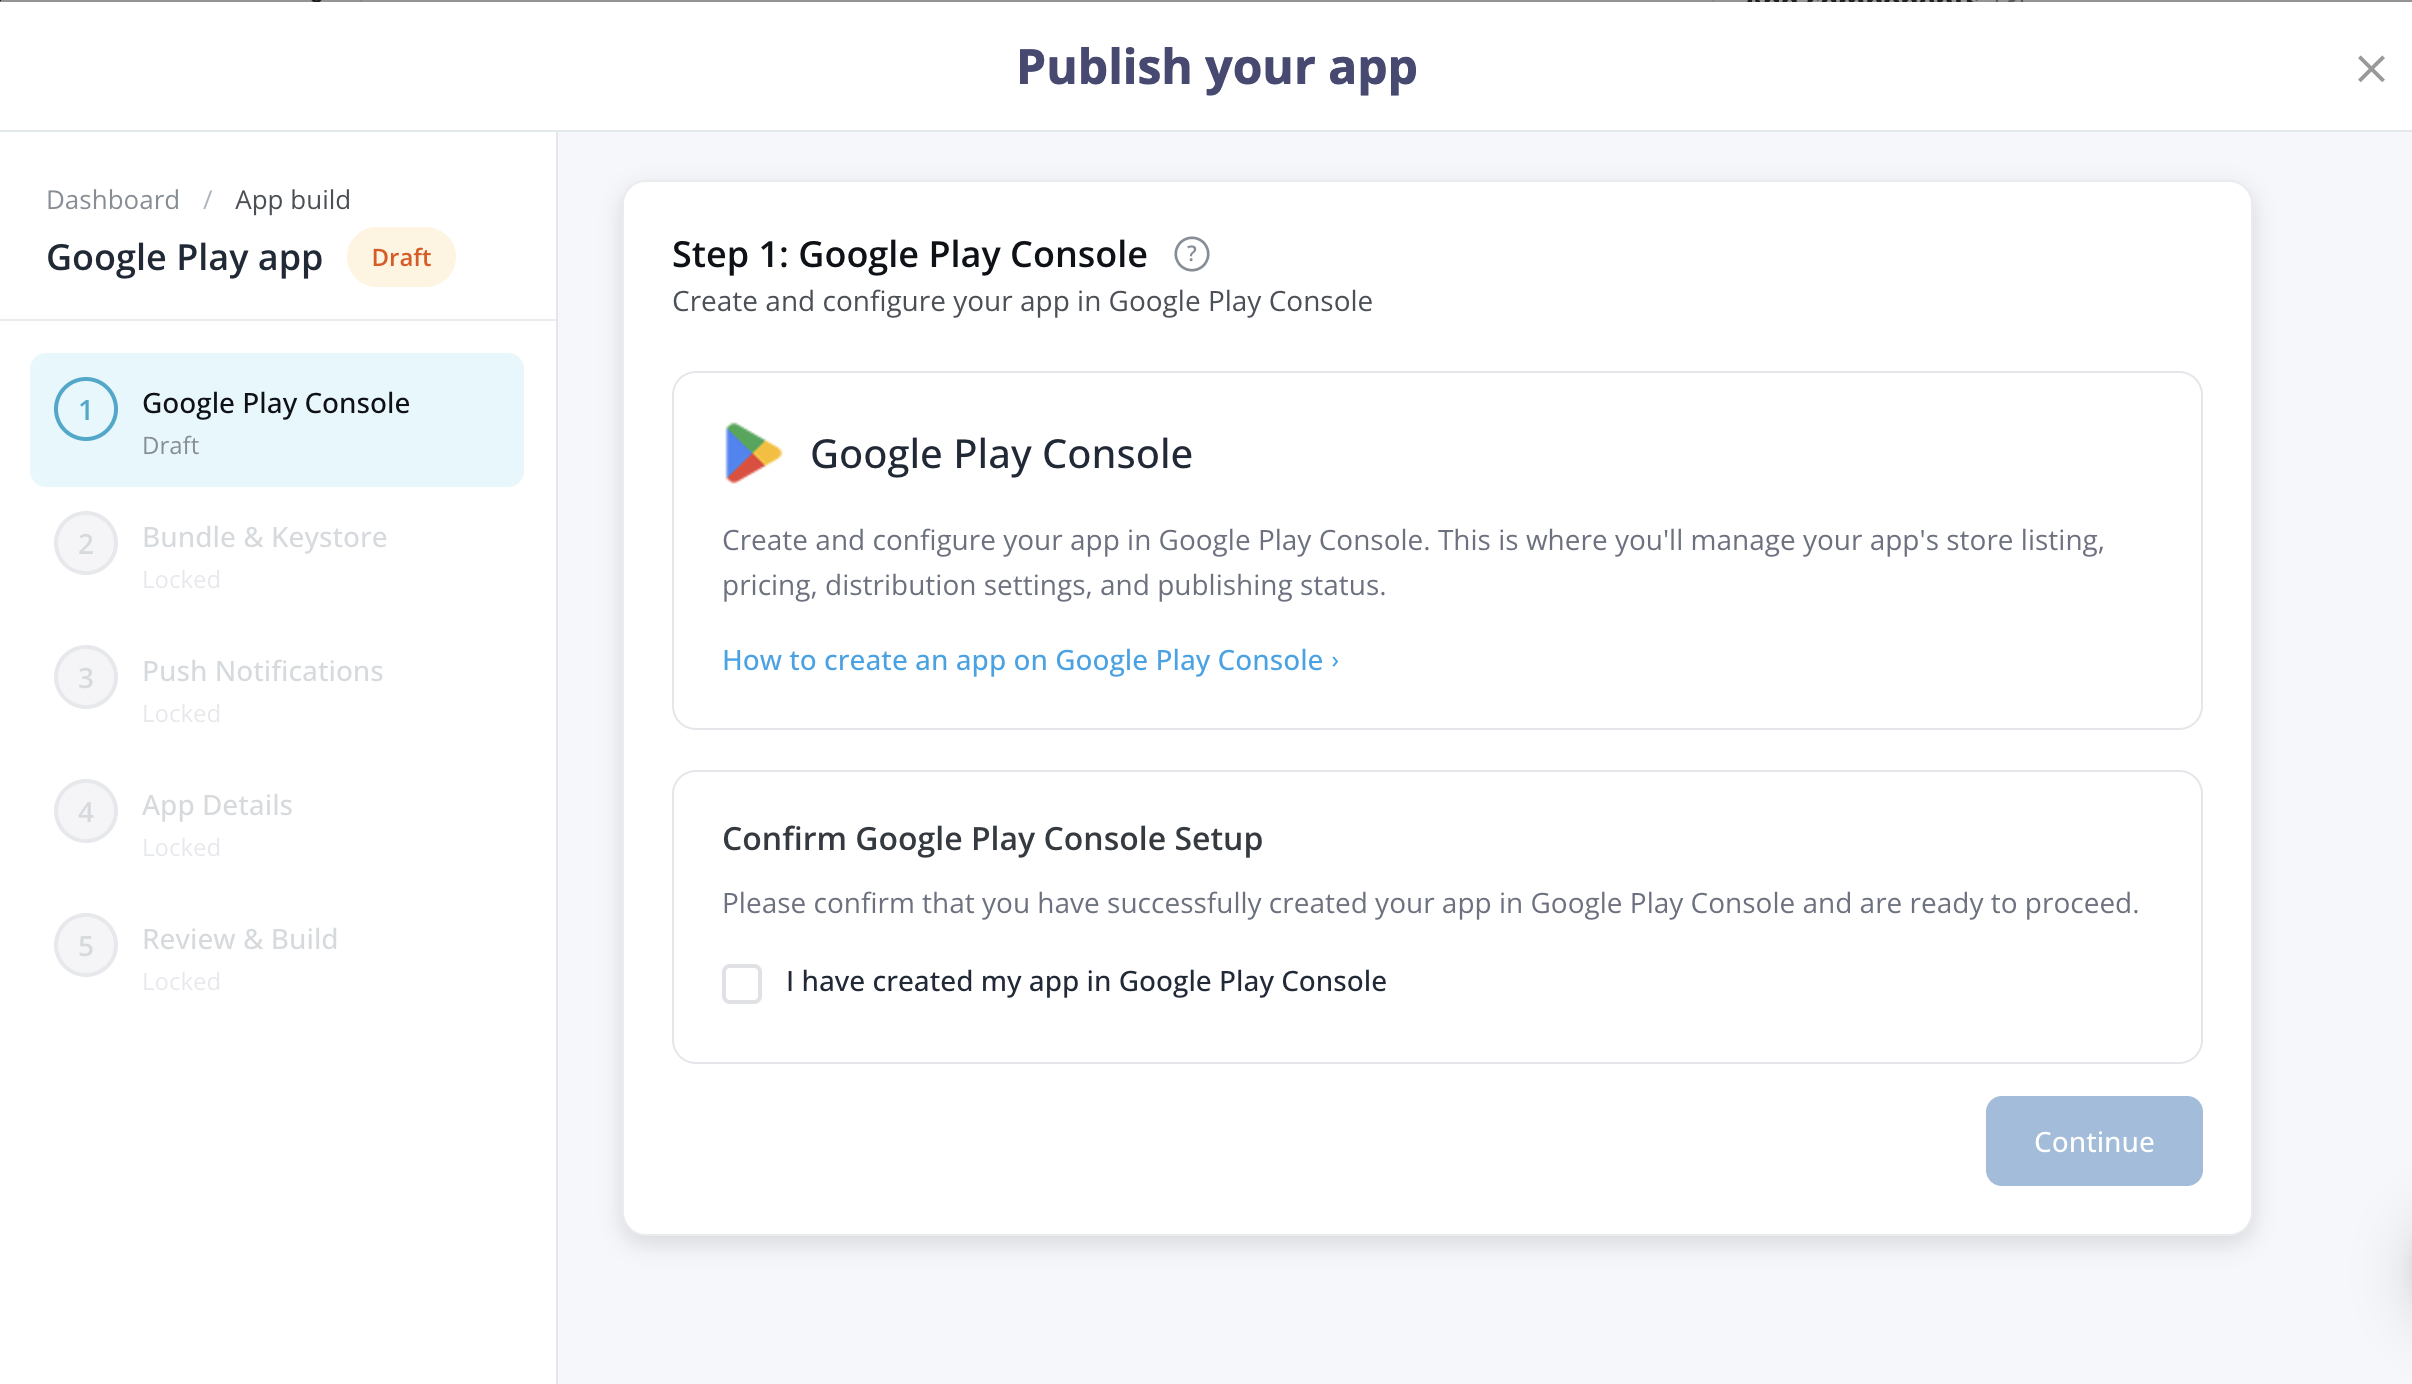
Step 1: Google Play Console setup
Before Fliplet builds your app, it must exist in Google Play Console.
- Go to Google Play Console
- Click Create app
- Enter your app name and select a default language
- Choose App or Game, and Free or Paid
- Accept the Developer Program Policies
- Click Create app
Return to the Publishing Dashboard and check the confirmation box to confirm your app exists in Google Play Console.
Click Continue.
Publishing an update? You do not need to create a new app listing. Confirm the setup and proceed — your existing package name and configuration are reused.
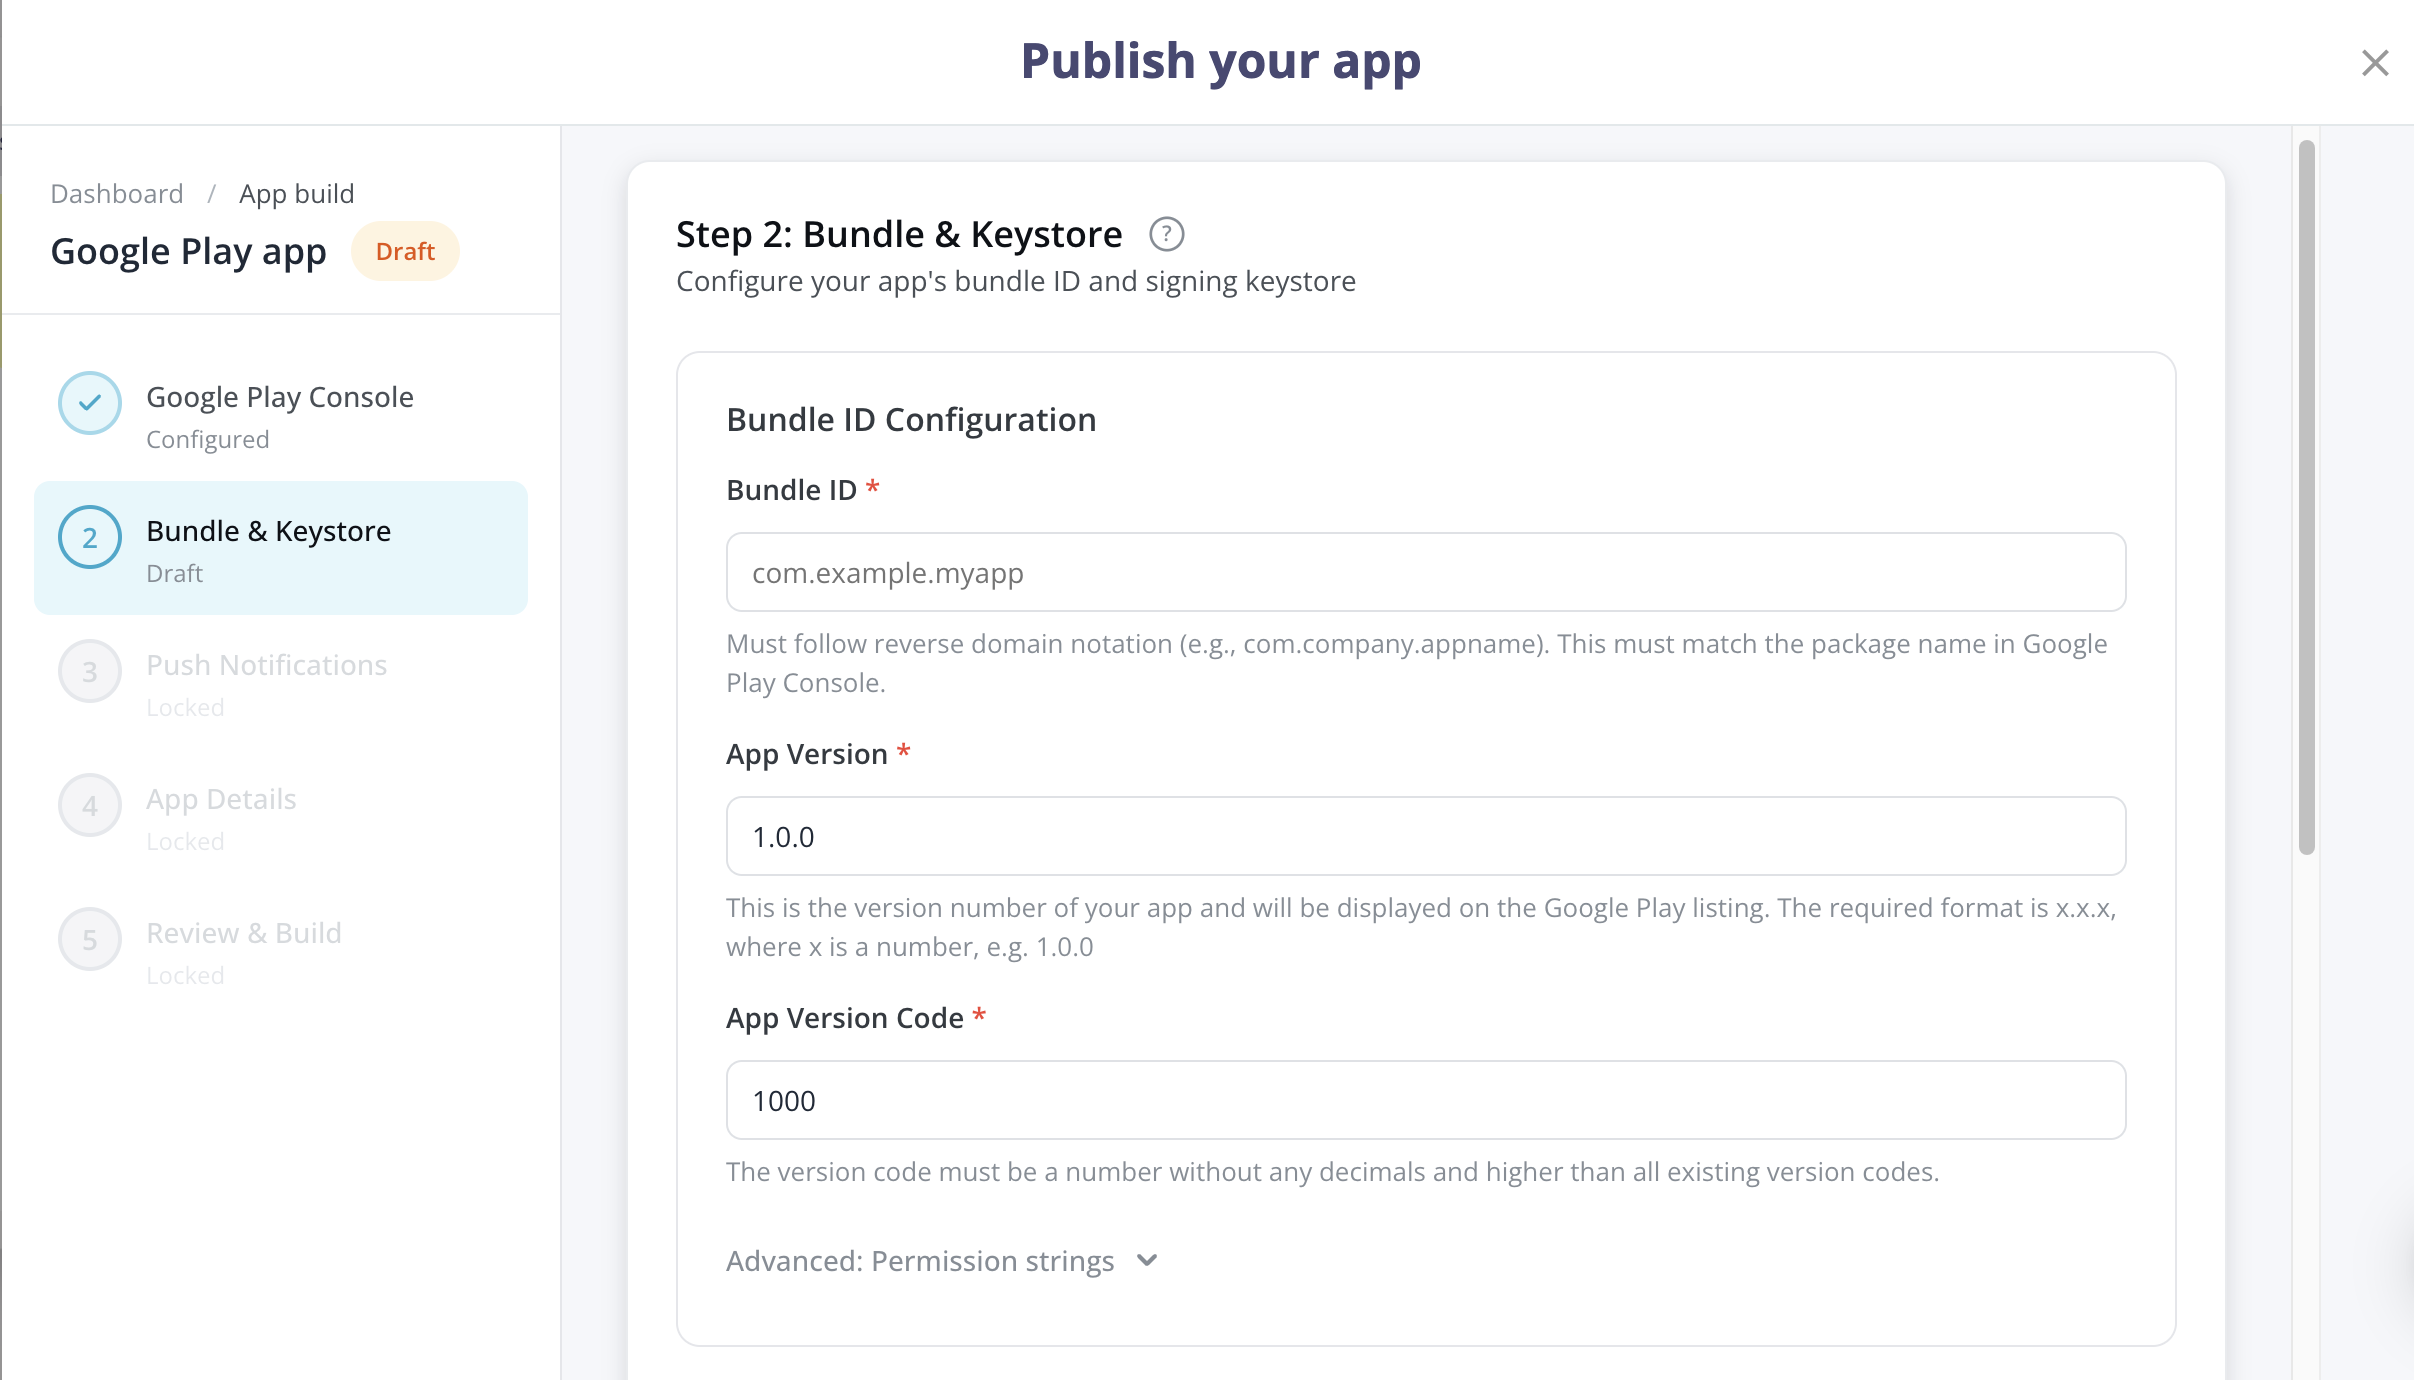
Step 2: Bundle ID and keystore
Configure your app’s unique identifier, version, and signing key.
Bundle ID (package name)
Enter your app’s Bundle ID in reverse domain notation (e.g., com.yourcompany.yourapp). This must match the package name in Google Play Console.
| Field | Details |
|---|---|
| Bundle ID | Cannot be changed after your first build is published. |
| App version | Semantic version number in x.x.x format (e.g., 1.0.0). Increase this for each release. |
App signing (keystore)
Fliplet generates a secure keystore for signing your Android app automatically. In most cases, no action is required.
If you are migrating from an existing app and need to use your own keystore, expand Advanced: Use your own keystore instead and upload your .jks or .keystore file along with its password.
App links (optional)
App links let users open your app directly from web URLs (deep linking). To enable them:
- Check Enable App Links for this app
- Enter your SHA-1 Certificate Fingerprint
Skip this if you do not need deep linking.
Click Continue.
Step 3: Push notifications (optional)
If your app does not use push notifications, skip this step and click Continue.
To enable push notifications, configure Firebase Cloud Messaging (FCM) by uploading two files:
google-services.json
- Go to Firebase Console
- Click Add project (or select an existing one)
- Click Add app and select Android
- Enter your app’s Bundle ID and click Register app
- Download the
google-services.jsonfile - Upload it in the Publishing Dashboard
Service account key (JSON)
- Go to Google Cloud Console
- Select your Firebase project
- Go to IAM & Admin > Service Accounts
- Click your Firebase service account
- Go to the Keys tab and click Add Key > Create new key
- Select JSON and click Create to download the key file
- Upload it in the Publishing Dashboard
Click Continue.
Step 4: App details
Configure how your app appears on the device.
| Field | Required | Details |
|---|---|---|
| App name | Yes | The name displayed under the app icon on the device and on Google Play |
| App icon | Yes | 512 x 512 PNG. Shown on the home screen and in the Play Store |
| Splash screen | Yes | The image displayed briefly when your app launches |
Upload your images by clicking or dragging files into the upload areas.
Click Continue.
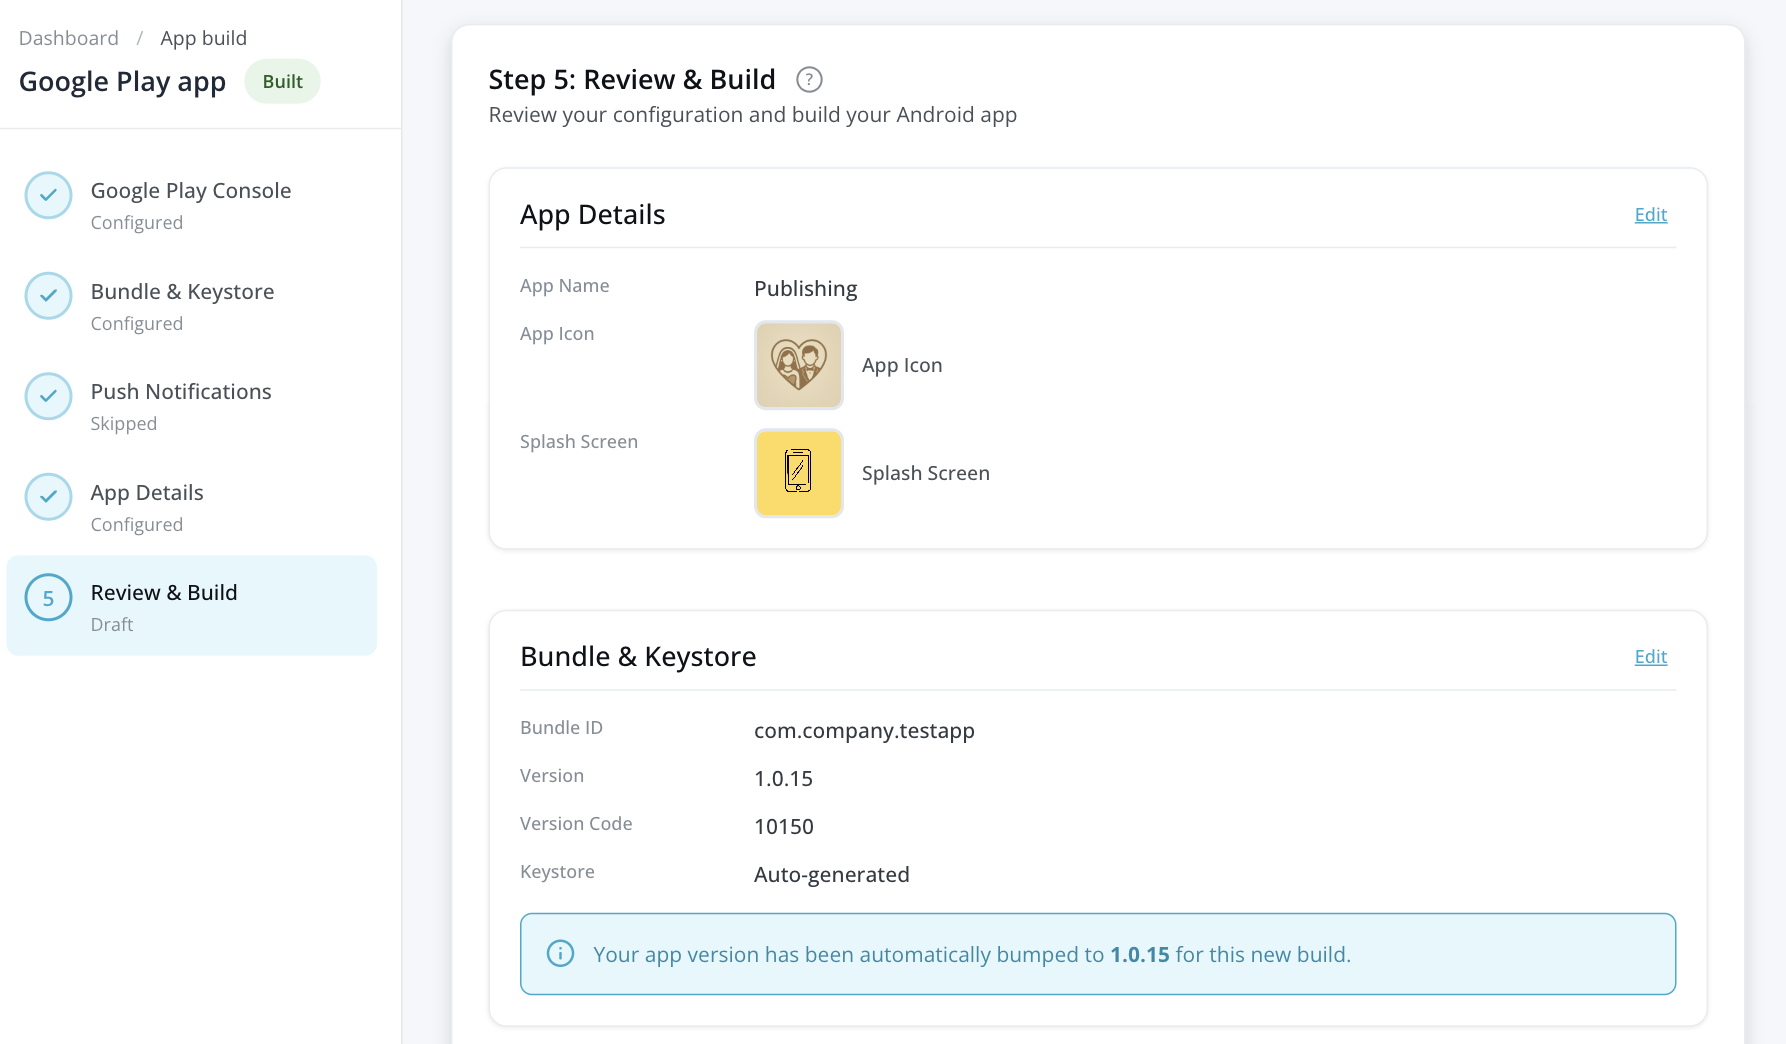
Step 5: Review and build
Review all your settings before building:
- App details — Name, icon, and splash screen
- Bundle ID and version — Package name and version number
- Keystore — Signing configuration status
- Push notifications — Firebase configuration status
To change a setting, click Edit next to that section.
When everything is correct, click Start Build.
What happens during the build
After you click Start Build:
- Fliplet packages your app with all configured settings
- The app is built as an Android App Bundle (AAB)
- Real-time progress updates appear on the Android Publishing Dashboard
The status badge changes to In Progress while the build runs. You can leave the page — the build continues in the background.
To cancel a build in progress, click Cancel app build on the Android Publishing Dashboard.
When the build succeeds, the status changes to Built.
After the build
Once your app is built, download it and complete the submission in Google Play Console.
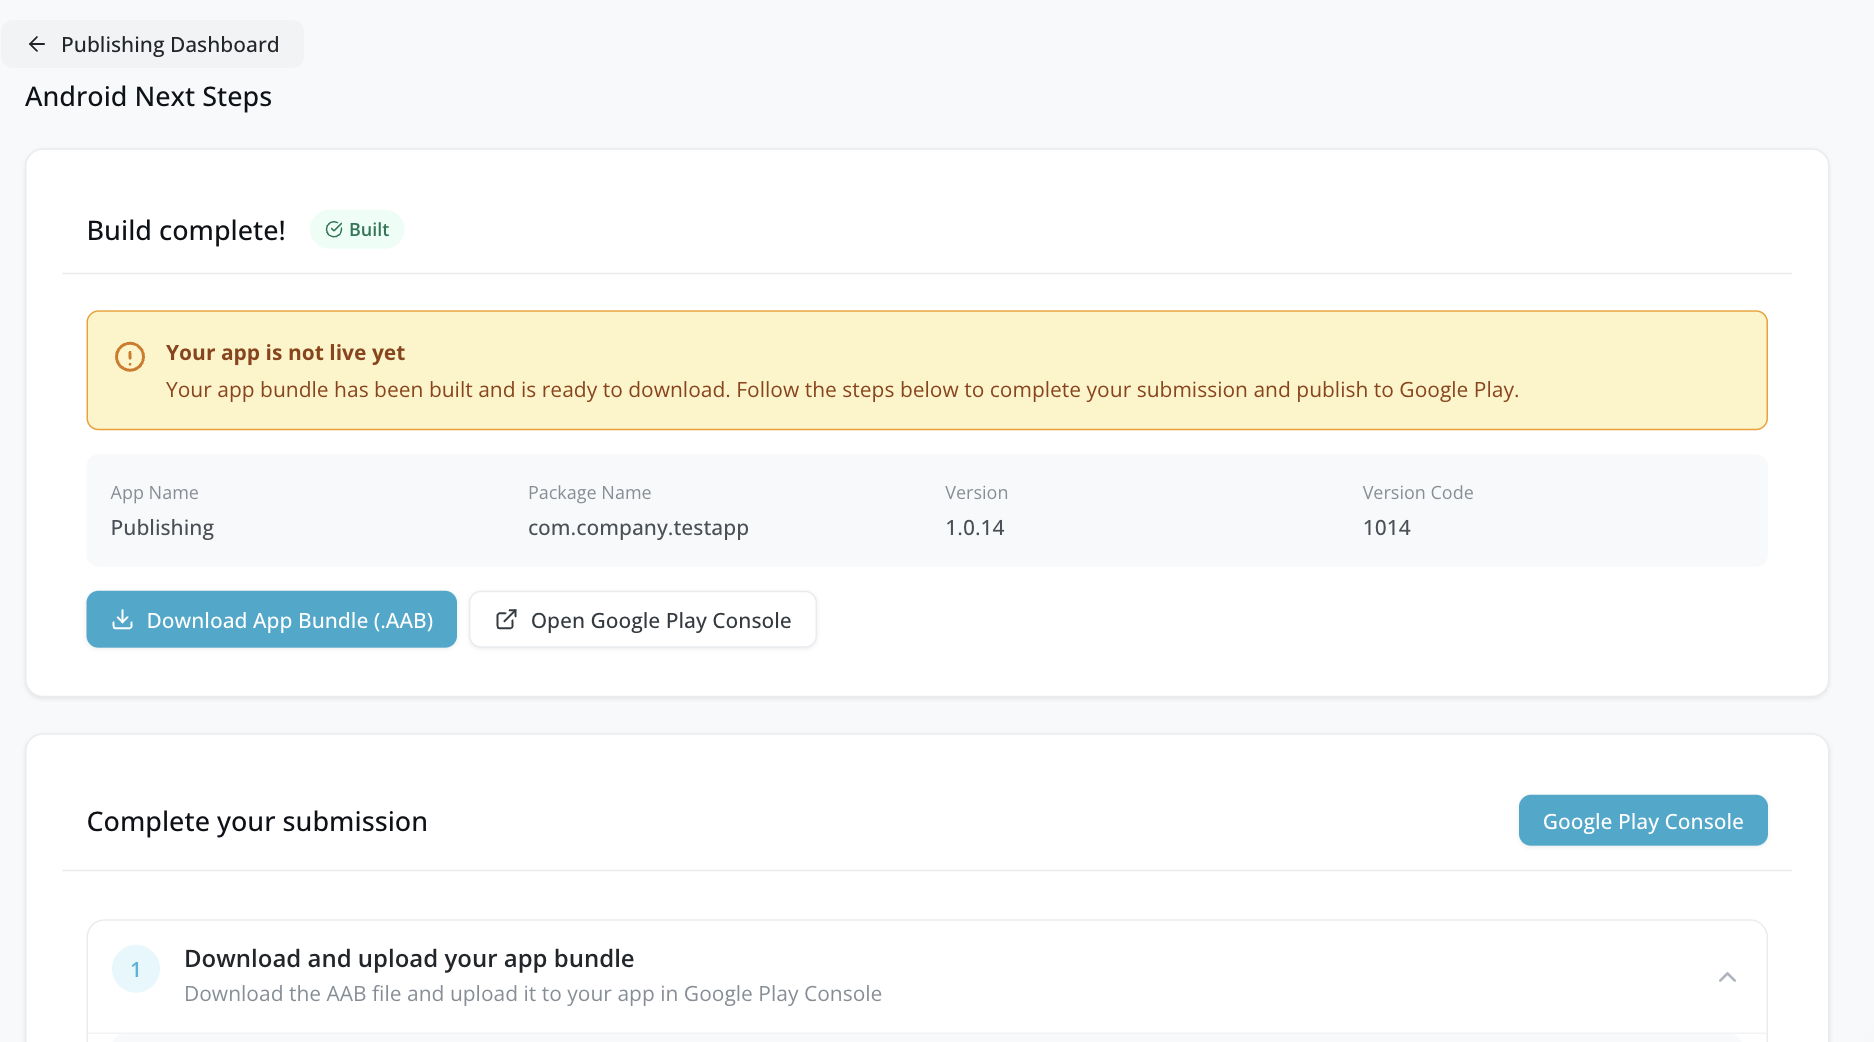
Download your app bundle
Click Download App Bundle (.AAB) to download your signed Android App Bundle.
| Detail | Value |
|---|---|
| File format | Android App Bundle (.aab) |
| Signed | Yes, with your distribution keystore |
Set up your app in Google Play Console
In your app’s dashboard in Google Play Console, click Set up your app and complete the required tasks:
| Task | Details |
|---|---|
| Privacy policy | URL to your privacy policy |
| App access | Provide test credentials if your app requires login |
| Ads | Declare whether your app contains ads |
| Content ratings | Complete the content rating questionnaire |
| Target audience | Select target age groups |
| Category | Choose your app category and add contact details |
Complete the data safety form
Google requires you to declare how your app collects and handles user data. This information appears on your store listing.
| Field | Details |
|---|---|
| Data collection | Declare what data your app collects |
| Data sharing | Specify if data is shared with third parties |
| Security | Confirm data is encrypted in transit (yes for Fliplet apps) |
| Data deletion | Indicate if users can request data deletion |
For Fliplet apps, you typically select Name, Email, App activity, and Device identifiers as collected data types.
See Google’s data safety requirements for detailed guidance.
Complete your store listing
Add the content that appears on your Google Play Store listing page:
| Field | Requirement |
|---|---|
| App name | Display name on Google Play |
| Short description | Up to 80 characters |
| Full description | Up to 4,000 characters |
| App icon | 512 x 512 pixel PNG |
| Feature graphic | 1024 x 500 pixel image |
| Screenshots | At least 2 screenshots for phone and tablet |
Testing requirements (personal accounts created after November 13, 2023)
This section applies only to personal Google Developer accounts created after November 13, 2023. If your account was created before that date, or you have an organization account, skip to the next step.
Google requires closed testing before you can publish to production:
| Requirement | Details |
|---|---|
| Closed testing | Upload your AAB to the closed testing track |
| Testers | Add at least 12 testers by email |
| Duration | Testers must be opted in for 14 consecutive days |
| Production access | Apply for production access after meeting the testing criteria |
See Google’s testing requirements for full details.
Upload your bundle and submit for review
- In Google Play Console, go to Production > Countries/regions and select where your app will be available
- Go to Production > Create new release
- Upload the AAB file you downloaded from Fliplet
- Add release notes describing what is in this version
- Click Review release
- Click Start roll-out to Production
After submission, your app progresses through: Pending publication > In review > Published.
Google typically reviews apps within a few days. First-time submissions can take up to 7 days.
Publish an update
To release a new version:
- Open the Publishing Dashboard and go to Android
- Click Rebuild App
- Your settings are pre-filled from the previous build, and the version number increments automatically (e.g.,
1.0.0to1.0.1) - Make any changes needed
- Click Start Build
After the build completes:
- Download the new AAB file
- In Google Play Console, create a new production release
- Upload the new AAB
- Submit for review
Troubleshooting
Build flow issues
| Issue | Solution |
|---|---|
| Invalid Bundle ID format | Use reverse domain notation (e.g., com.company.appname). Must start with a letter and contain only lowercase letters, numbers, underscores, and dots. |
| Version format error | Use semantic versioning in x.x.x format (e.g., 1.0.0). |
| Keystore upload failed | Verify you are uploading a valid .jks or .keystore file and that the password is correct. |
| Firebase configuration failed | Verify that your google-services.json contains the correct Bundle ID and that your service account key has the required permissions. |
| Build failed | Check the error details on the Android Publishing Dashboard and click Retry Build. |
Google Play review issues
| Issue | Solution |
|---|---|
| Data safety form incomplete | Complete all required fields in the Data Safety section of Google Play Console. |
| Missing store listing content | Add screenshots, descriptions, and a feature graphic. |
| App rejected for policy violation | Review Google’s Developer Program Policies and address flagged issues. |
| Testing requirement not met | Complete the 14-day closed testing period with at least 12 testers, then request production access. |
| App access issues | Provide working test credentials in the App Access section if your app requires login. |
Quick reference
| Item | Value |
|---|---|
| Google Play Console | play.google.com/console |
| Firebase Console | console.firebase.google.com |
| Google Cloud Console | console.cloud.google.com |
| App icon size | 512 x 512 PNG |
| Feature graphic size | 1024 x 500 |
| Bundle ID format | com.company.appname (reverse domain) |
| Version format | x.x.x (e.g., 1.0.0) |
| Google review time | Typically a few days (up to 7 for first-time submissions) |